Posted: February 23rd, 2009 | Author: Michael | Filed under: OCS Development, UCMA 2.0 | No Comments »
If you are just starting out in developing an application using UCMA, you may be confused about where to get the settings to feed the constructors for ServerPlatformSettings, ApplicationEndpointSettings, and UserEndpointSettings.
If divining the port and GRUU from the entrails of an animal is not an option, you will need to start by “provisioning” your application by creating a trusted service object for it in Active Directory. If it uses an ApplicationEndpoint (usually because it is a “bot” rather than a proxy for a particular user), you will also need to provision it with one or more contacts.
The easiest way to do this provisioning is with the ApplicationProvisioner.exe tool that is packaged with the UCMA v2.0 SDK. (You will still need to have enough permissions to create trusted service objects and contact objects in Active Directory in order to use ApplicationProvisioner.exe.) You can find the tool in the UCMA SDK 2.0 directory under UCMACoreSample ApplicationsCollaborationApplicationProvisioner. You may need to compile the solution in Visual Studio to get the executable.
There is a fairly thorough step-by-step description of how to provision a new application using ApplicationProvisioner.exe on MSDN at http://msdn.microsoft.com/en-us/library/dd253360(office.13).aspx.
Once you provision your application, there are basically two ways to snap your newly minted GRUU and other settings into your UCMA code. One is simply to double-click the listing under “Servers” in ApplicationProvisioner.exe and copy the GRUU from the View Server box. At this juncture, you can drop the unpronounceable sequence of numbers and letters into a config file, live dangerously by adding it directly into your code, or even sell it on eBay for $10k and donate the proceeds to the Salvation Army.
A cleaner, if slightly more complex, alternative is to reference ApplicationProvisioning.dll from your project and use the ApplicationProvisioning API to load the settings dynamically using your application’s name. The advantage is that even if you need to change the trusted service later,you won’t need to make any configuration changes to your application. The new settings will be loaded next time you start up the application.
You can find an article on this method at http://msdn.microsoft.com/en-us/library/dd253328(office.13).aspx.
Posted: February 23rd, 2009 | Author: Michael | Filed under: Uncategorized | No Comments »
Generics are one of my favorite bits of C# syntax. They regularly come in handy for making code more elegant and readable. For example, I love using them in applications that do a lot of deserializing, especially if there is anything else (logging, maybe) that I want to be sure of doing at the same time. The method I use looks something like this:
public T Deserialize(string xml) where T : class
{
if (string.IsNullOrEmpty(xml))
throw new ArgumentNullException("xml cannot be null or empty");
XmlSerializer serializer = new XmlSerializer(typeof(T));
T obj;
using (StringReader reader = new StringReader(xml))
{
obj = (T)serializer.Deserialize(reader);
}
_logger.Log(string.Format("Deserialized {0}", obj));
return obj;
}
The T in the angle brackets represents the type of the object that I am trying to deserialize. (It doesn’t have to be the letter T, actually; it can be any valid variable name.) You can restrict the possible types with the where keyword; here, the where T : class after the method declaration specifies that the type must be a class, so if someone tries to use Deserialize, they will get a compiler error. You can also use the T to set the return type, so that the return type of the method can vary. Last but not least, if you are in Boston you can use the T to get from South Station to Harvard Square.
The beauty of this approach is that everything remains strongly-typed. If I deserialize a GolgiApparatus object using Deserialize, the return value will be an GolgiApparatus. There’s no need to identify the object return value as a GolgiApparatus. I can write code like this:
GenericXmlSerializer xml =
new GenericXmlSerializer(new Logger());
GolgiApparatus ga = new GolgiApparatus();
Exception ex = new Exception("you can't do that");
string serializedGolgi = xml.Serialize(ga);
string serializedException = xml.Serialize(ex);
GolgiApparatus reconstitutedApparatus =
xml.Deserialize(serializedGolgi);
In my experience,any time you need to cast a return value from object to some other type,you can clean it up using either a generic method or a generic class.
Incidentally, my Serialize method, which doesn’t need to use generics, usually looks something like this:
public string Serialize(object obj)
{
if (obj == null)
throw new ArgumentNullException("obj cannot be null");
XmlSerializer serializer = new XmlSerializer(obj.GetType());
string xml;
using (StringWriter writer = new StringWriter())
{
serializer.Serialize(writer, obj);
xml = writer.ToString();
}
_logger.Log(string.Format("Serialized {0}", obj.ToString()));
return xml;
}
Posted: February 19th, 2009 | Author: Michael | Filed under: OCS Development, UCMA 2.0 | No Comments »
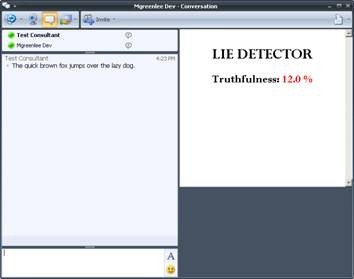
Office Communicator has a number of useful but mostly unknown features. One of these is its ability to display a custom context pane in a conversation window. The context pane shows up where the video goes in a video chat, and displays HTML content from any intranet or trusted URL.
The way to trigger this window is to send a SIP INFO message with a particular type of XML document to the conversation. All of the remote participants that receive the message will then get the context pane in Communicator if they are configured appropriately.
Notice the catch: there are a couple of things that need to be configured on each client in order for the context pane to show up.
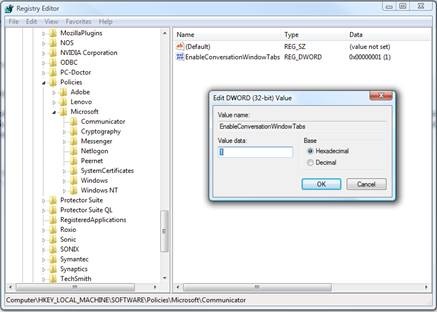
First, a registry setting needs to be set to enable the context pane functionality in Communicator. To do this, open up regedit.exe and navigate to:
HKEY_LOCAL_MACHINESOFTWAREPoliciesMicrosoftCommunicator
You may have to create some of those folders if they don’t already exist. Just right-click on the level above it and select New Key.
Once you’ve found the right key, create a DWORD (32-bit) value called EnableConversationWindowTabs, with a value of 1.
So much for registry settings. Next, if the URL you want to use for the content of your context window is not on your local intranet, you will need to add it to your trusted sites. You can do this through Internet Options in Internet Explorer.


Once everything is configured properly, you’ll be able to see the context window when your OCS endpoint receives a SIP INFO message with “call associated data” information.
The code to send this message through UCMA v2.0 is actually quite simple. You will need the format of the XML document, as well as the content type; I like to keep these in constants so the code stays clean.
Here is the text of the XML document. (The {0} in the XML block represents a unique ID for each context pane, and the {1} represents the URL of the content.)
private const string CONTEXT_WINDOW_MESSAGE = "<associatedData xmlns="http://" +
            "schemas.microsoft.com/LCS/2007/04/CallAssociatedData" xmlns:xsi="http://" +
            "www.w3.org/2001/XMLSchema-instance" xsi:schemaLocation="http://" +
            "schemas.microsoft.com/LCS/2007/04/CallAssociatedData">" +
            "" +
            "{1}false" +
            "";
Here is the content type:
private const string CONTEXT_WINDOW_CONTENT_TYPE = "application/ms-call-associated-data+xml";
An integer instance variable will help keep track of the next unique ID in the sequence.
private int _contextWindowId = 1;
Before you can send the INFO message, you will already have had to set up a CollaborationPlatform,endpoint,conversation, and call. If you need help with the steps, you should be able to find detailed instructions in the UCMA v2.0 SDK documentation, or you can look at some of the samples that come packaged with the SDK.
In order to send the INFO message, we need to call the BeginSendInfo method on an established call. The BeginSendInfo method takes a byte array for the content of the INFO message, so the next step is to encode the XML document as a byte array:
 byte[] bytes = Encoding.UTF8.GetBytes(string.Format(CONTEXT_WINDOW_MESSAGE,
                _contextWindowId++, _url));
Notice that I’m plugging the context window ID and the content URL into the XML document, and also incrementing the context window ID.
Finally, we call BeginSendInfo on the Call object, passing in the content type, the byte array, and a callback delegate. If everything is set up correctly, the remote participant(s) in the call will see the context pane appear in their conversation windows.
infoMessageCall.BeginSendInfo(
                new System.Net.Mime.ContentType(CONTEXT_WINDOW_CONTENT_TYPE), bytes, null,
                asyncResult => infoMessageCall.EndSendInfo(asyncResult), null
            );
If a configuration problem is preventing the context window from working properly, you should see an error message in the conversation window that says “Could not display a form related to this conversation, which may prevent access to some options. If this problem persists, contact your system administrator.” If you are getting this message, check the registry setting again, and make sure that the URL you are using is a trusted site. You can also try looking at the properties of the SipResponseData object that is returned by the EndSendInfo method; this may give you a clue to the problem.
Note that you are perfectly free to pass in a query string parameter in the URL you send. You can do some really cool contextual things by linking to server-side applications that display data dynamically based on the parameters passed in with the URL.
Here is the complete code of my ContextWindowMessage class:
/// Handles the sending of the INFO message that causes the extended window
/// to appear in Communicator.
public class ContextWindowMessage {
private const string CONTEXT_WINDOW_MESSAGE = "<associatedData xmlns="http://" +
"schemas.microsoft.com/LCS/2007/04/CallAssociatedData" xmlns:xsi="http://" +
"www.w3.org/2001/XMLSchema-instance" xsi:schemaLocation="http://" +
"schemas.microsoft.com/LCS/2007/04/CallAssociatedData">" +
private const string CONTEXT_WINDOW_CONTENT_TYPE =
"application/ms-call-associated-data+xml";
private int _contextWindowId = 1;
private string _url = string.Empty;
public ContextWindowMessage(string url) {
if (string.IsNullOrEmpty(url)) {
throw new ArgumentException("URL cannot be null.");
/// Sends the INFO message with the URL for the extended window.
/// The call in which to send the INFO message.
public void SendToCall(Call infoMessageCall) {
// We need to supply the INFO message as a byte array. The message itself is an
// XML document, whose format is in the CONTEXT_WINDOW_MESSAGE constant.
byte[] bytes = Encoding.UTF8.GetBytes(string.Format(CONTEXT_WINDOW_MESSAGE,
_contextWindowId++, _url));
// To send the INFO message, we use the BeginSendInfo method on the Call
// (not the Flow). In order for the extended window to appear, the first
// parameter (the content type) should be "application/ms-call-associated-data+xml".
infoMessageCall.BeginSendInfo(
new System.Net.Mime.ContentType(CONTEXT_WINDOW_CONTENT_TYPE), bytes, null,
asyncResult => infoMessageCall.EndSendInfo(asyncResult), null
Feel free to get in touch if you have any questions about custom context windows that I haven’t covered here.