Posted: August 20th, 2011 | Author: Michael | Filed under: UCMA 3.0 | Tags: Replaces header, SIP, transfer | 3 Comments »
I once read about a psychology study which went like this: when the subjects showed up for the study, each one was sent to a desk to register, where he or she was greeted by a receptionist. The receptionist then reached down under the counter to get some papers, going out of sight. A COMPLETELY DIFFERENT PERSON wearing a different colour shirt stood up and continued the conversation. Most of the study subjects completely missed the switch, and when asked later about their check-in experience, said that they hadn’t noticed anything unusual.
This is the image that comes to mind when I think about call replacement. In a nutshell, the call replacement feature makes it possible to “switch out” participants in a call, just like the two receptionists in the psychology study. Call replacement is one of the most confusing, and therefore most underused, features in Lync. In this post, I’ll explain how it works, what it does behind the scenes, and why you would want to use it in your UCMA applications.
What It’s Good For
First of all, what’s the purpose of call replacement?
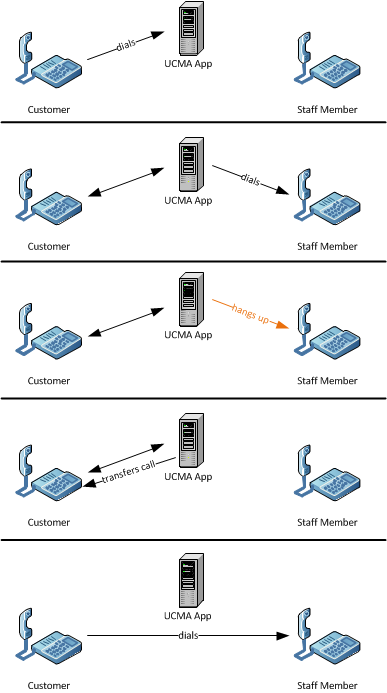
Let’s say you have a UCMA application which answers calls from customers and allows them to select the staff member they want to talk to. It then dials that person, announces the caller, and puts the caller through to the staff member.
One way to do this would be to call the staff member, play the announcement, hang up that call, and then transfer the customer over to the staff member, creating another call, much like in the diagram below.

The bothersome thing about this is that the staff member receives two calls, the first from the application and the second from the customer. Let’s look at another option that uses call replacement.

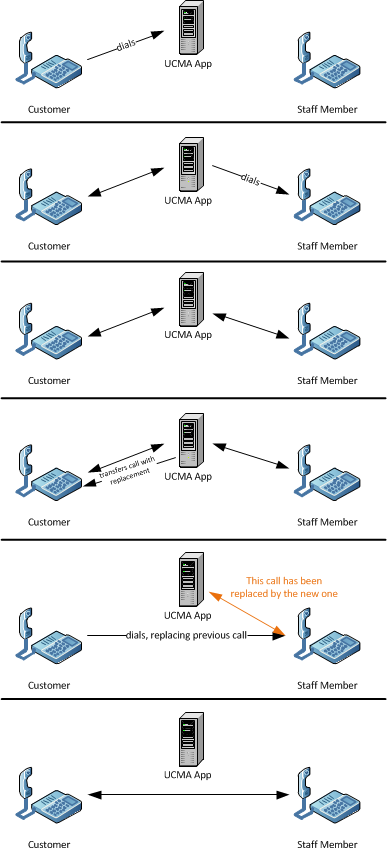
In this second scenario, we don’t hang up the call to the staff member. Instead, when we perform the transfer on the customer call, we tell it to replace the staff member call as part of the transfer. So when the customer calls the staff member, it includes an extra SIP header which contains information identifying the original staff member call. As a result, the customer “takes over” the UCMA application’s place in the call with the staff member. The staff member won’t see any new windows pop up, and won’t need to do anything. He or she will simply stop hearing the application and will start hearing the customer instead.
When you perform a call replacement, you replace an existing Lync call with a new call in a way that is seamless for the call recipient (in this case, the staff member). When I say “seamless,” what I mean is that the call stays active for the recipient, and no new windows pop up.
How It Works
In our example above, when the UCMA application transfers the customer call, it uses what’s called a “supervised” transfer. This is what it looks like in code:
audioVideoCall.BeginTransfer(callToReplace, OnTransferCompleted, audioVideoCall);
So, instead of passing a SIP URI into BeginTransfer, you are passing in a reference to an AudioVideoCall object.
When you initiate the transfer, this is what happens: first, the UCMA application sends a SIP REFER message to the transferee. In the example above, this is the customer. The REFER message contains a REFER-TO header, which is more or less like this:
REFER-TO: <sip:staff@contoso.com;opaque=user:epid:NbOC9Uuhobt7890l7UOEht980QhAAA;gruu?REPLACES=f048bd6d-2ece-4e39-88c7-4a50496d8492%3Bfrom-tag%3D893214e76a%3Bto-tag%3D539db20c4b>
In plain English, what this says is that the user receiving the REFER should call staff@contoso.com, at the specific endpoint specified. When it makes that call, it should include a REPLACES header identifying a specific call to be replaced.
The transferee then places a call to the transfer target, in this case staff@contoso.com. To initiate the call, it sends a SIP INVITE message. Into this INVITE message, it adds a REPLACES header like this:
REPLACES: f048bd6d-2ece-4e39-88c7-4a50496d8492;from-tag=D893214e76a;to-tag=539db20c4b
The REPLACES header contains three elements: a call ID (the first part), a from tag, and a to tag. These three elements uniquely identify a call (a SIP dialog, to be specific) between two endpoints that the new call should replace. All three can be found in the SIP messages that go into establishing the original call.
When Lync Server sees the REPLACES header, it does a sort of handoff, plugging in the new call where the replaced one was.
Call Replacement Without a Transfer
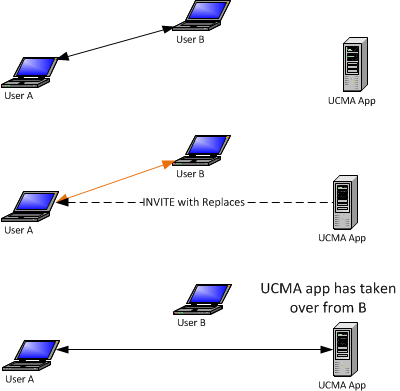
In UCMA, the easiest way by far to initiate a call replacement is through a supervised transfer. However, there’s no inherent reason why you need to do a transfer in order to replace a call. If you’re willing to manually add a REPLACES header to an outgoing call, you can “take over” another call from your application itself, as the diagram below illustrates. There’s one catch: you need to know those three pieces of information that go in the REPLACES header, namely the call ID, the from tag, and the to tag.

Why might you want to do this? For an example, imagine you have two UCMA applications running on separate servers. One is an interactive voice response (IVR) application which answers calls and asks automated questions to direct calls appropriately. The other is a phone directory which callers can be forwarded to from the IVR.
Since these are two separate processes running on separate servers, there needs to be some way to get calls from one to the other. You could do a simple transfer to the phone directory SIP URI, but if you do that you have no way of passing context between the two applications. To more smoothly hand over the call, you can have the second application carry out a call replacement, using the call ID, from tag, and to tag from the initial incoming call.
To get the call ID and tags, you can look at the return value from the EndEstablish or EndAccept method. The return value for both methods is an instance of CallMessageData. The CallMessageData class has a DialogContext property, and you can look at CallMessageData.DialogContext.CallID, CallMessageData.DialogContext.LocalTag, and CallMessageData.DialogContext.RemoteTag for the values. You can get the values when establishing the original call, and pass them to the other application by whatever method: a database table, a WCF service, or something else.
When doing the call replacement, you would put the values into the REPLACES header like this:
REPLACES:<CallID>;from-tag=<RemoteTag>;to-tag=<LocalTag>
To add the REPLACES header to a new outgoing call, you can use an instance of AudioVideoCallEstablishOptions:
// Build the establish options, including the extra header.

AudioVideoCallEstablishOptions options = new AudioVideoCallEstablishOptions();

options.Headers.Add(replacesHeader);


// Establish the call.

AudioVideoCall avCall = new AudioVideoCall(conversation);

avCall.BeginEstablish(destinationUri, options, OnEstablishCompleted, avCall);
Assuming the destination URI is the original caller, this will cause the second UCMA application to take the place of the first UCMA application with no interruption for the original caller.
Call Replacement and UCMA Workflow
If you try to use supervised transfers or call replacement in applications that use UCMA Workflow, you may run into problems. The most common reason for this is that in order for a supervised transfer to work, both participants must indicate that they support the REPLACES header; and UCMA Workflow defaults to disabling support for call replacement.
You can check support for REPLACES on any individual call by looking at the IsReplacesSupported property on AudioVideoCall:
if (avCall.IsReplacesSupported)

{

// Do a supervised transfer...

}
If you use a UCMA Workflow to answer an incoming call, and you want to use supervised transfers with that call, you will need to set the SupportsReplaces property on the AcceptCallActivity to true. You’ll need to do this before the call is actually accepted, because REPLACES support needs to be set when the call starts, so you may need to add a code activity to your workflow to set the property.
This is the first point to check if you have trouble with a supervised transfer in a UCMA Workflow application.
Conclusion
Call replacement can be a bit tricky to understand, but it has many uses in Lync, and allows you to do some things with UCMA applications that would otherwise be difficult, hacky, or impossible. It’s definitely worth taking some time to understand how it works behind the scenes and what you can do with it. Hopefully this post has given you an overview of how to use call replacement and what you can do with it. Please feel free to get in touch if you have any questions about anything I’ve described, or if you’d like to see more details in a follow-up post.


