Posted: March 21st, 2009 | Author: Michael | Filed under: OCS Development, UCMA 2.0 | No Comments »
The Internet can be a disturbing place. You may not expect that hundreds thousands of Internet delinquents are out to hijack your UCMA 2.0 application, but in the realm of Internet security, as with tipping your barber, the rule is always “better safe than sorry.”
Accordingly, when you are running a UCMA 2.0 application on a separate server, you need to create a certificate for it that is trusted by Office Communications Server. Since a number of people have asked, I am going to show you how to do this.
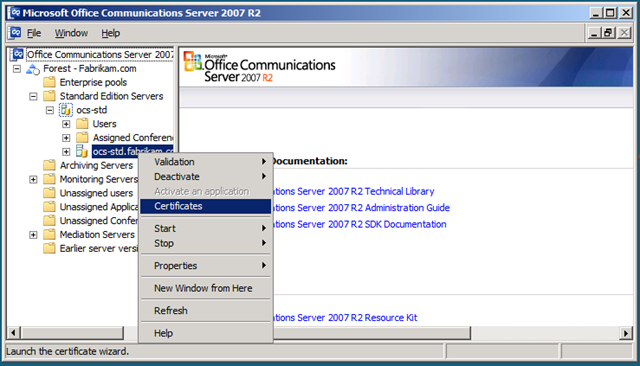
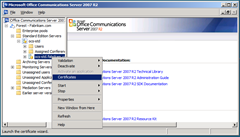
Our journey begins on the server that is functioning as your Standard Edition Server or a Front End Server. On that machine, go to the Office Communications Server 2007 R2 management console at Start –> All Programs –> Administrative Tools –> Microsoft Office Communications Server 2007 R2. You will see the lovely window depicted below. (Click on the screenshot to see a larger version.)
Expand those nodes in the left panel to get to your Standard Edition Server or Front End Server, and right-click on it. Choose the cleverly-named Certificates item.
You will get a new window for the Certificates Wizard. Click Next on the instructions page. Choose Create a new certificate and hit Next.
The next few screens walk you through the process of creating a certificate.
- Delayed or Immediate Request: You will want to choose Send the request immediately to an online certification authority.
- Name and Security Settings: For the name of the certificate you can use the fully qualified domain name (FQDN) of the server you want to run UCMA 2.0 applications on. Make sure that Mark cert as exportable is checked.
- Organization Information: The Organization field usually contains your organization’s legal name, and the Organizational unit field contains your department name.
- Your Server’s Subject Name: The subject name should be the exact FQDN of the server you’ll be using for your UCMA 2.0 applications.
- Geographical Information: You can handle this one.
- Choose a Certification Authority: Just what it says. You will need to have the root certificate for this certification authority installed on your UCMA 2.0 application server as well.

- Request Summary: Make sure everything looks right.
- Assign Certificate Task: Select Assign certificate later.
Once you’ve finished with the Certificate Wizard, you’ll need to export the certificate to move it to the other server. Right-click again on your server in the list, and choose Certificates. This time,choose Export a certificate to a .pfx file.
In the following screens,choose the certificate you just created, with the FQDN of your application server, and specify a password. Save the file in a remote and inaccessible location somewhere in the middle of the Kalahari Desert.
At this point, we will take a two minute break so you can transport your freshly minted .pfx file to your UCMA 2.0 application server. You can do this by creating a shared directory on one of the servers and sticking the .pfx in there, or by some other method of your choosing.
…
Okay, now that we’re back, it’s time to import the certificate on your application server. Open the Microsoft Management Console. You can do this by going to the Start menu and typing mmc.
In the Management Console, go to File –> Add/Remove Snap-in. Add the Certificates snap-in by choosing it in the list on the left and clicking Add. Choose Computer account and click Next and Finish. Click OK.
Expand the Certificates node.
It’s a downhill run from here, folks. Just right-click on Personal and select All Tasks –> Import. In the open dialog that comes up, you’ll need to select Personal Information Exchange (.pfx, .p12) in the file type drop-down next to the file name. Choose the .pfx file and click Open. Click Next, enter your password from earlier, Next, Next, Finish.
Congratulations! You’ve set up a certificate on your application server, you can sleep soundly at night, secure from those ten million UCMA 2.0 application server hijackers at large in cyberspace, and all is well in the world.
Please feel free to leave comments or contact me if you have any issues with this scary but rewarding process of creating certificates for UCMA 2.0 applications.
Posted: March 11th, 2009 | Author: Michael | Filed under: OCS Development, UCMA 2.0 | No Comments »
 Let’s say, for purposes of illustration, that you have a little problem.
Streamlining your Unified Communications development with the concise magic of UCMA 2.0 has suddenly made you rich and famous, and freed up most of your development time. Before, you spent hours hunched over an ancient 640×480 CRT monitor, debugging uncooperative server applications; now you write a few lines of code on your 30″ wall-mounted flat-panel monitor while toying with the allocation of your latest $10 million in investment funds on your other 30″ wall-mounted flat-panel monitor, and within minutes your application is ready for production.
The trouble: you don’t want your boss to think that all this wealth and fame has gone to your head. When she’s signed into Communicator and available, you want to make sure she sees that you’re slaving away, hard at work. When she’s away from the desk and can’t keep tabs on your Communicator presence, you can relax a little.
Thankfully, UCMA 2.0 allows you to manage presence subscriptions and receive notifications whenever there is a change in the presence of one of your subscription targets.
We worked through the code to get a platform and a UserEndpoint established in my last post, so this time I’ll skip ahead a bit and just give you a class with all of that code written. If you want to dig into the details of how the setup and teardown works,you can check out my previous post (on publishing presence).
This class is pretty generic,so you can use it for trying out other UCMA 2.0 features as well. The only caveat is that it hasn’t really got any error handling, so it’s obviously not suitable for production code or even for anything at all complicated.
public class PresenceMonitor
{
    private const string STATE_XML_FORMAT =
        "<state xmlns="http://schemas.microsoft.com/2006/09/sip/state"" +
        " xmlns:xsi="http://www.w3.org/2001/XMLSchema-instance" manual=" +
        ""true" xsi:type="userState">{0}" +
        "";

    private const string NOTE_XML_FORMAT =
        "" +
        "{0}";

    private const int AVAILABLE = 3500;
    private const int BUSY = 6500;

    private const string APP_USER_AGENT = ...
    private const string LOCALHOST = ...
    private const int PORT = ...
    private const string GRUU = ...
    private const string OCS_SERVER = ...
    private const int TLS_PORT = 5061;

    private string _mySipUri;
    private string _yourSipUri;

    private CollaborationPlatform _platform;
    private UserEndpoint _endpoint;

    public void Run()
    {
        Console.Write("Enter your SIP URI: ");
        _mySipUri = Console.ReadLine();

        Console.Write("Enter the SIP URI to monitor: ");
        _yourSipUri = Console.ReadLine();

        IAsyncResult startupAsyncResult = StartUp();

        Console.WriteLine("-----Press enter to shut down.-----");
        Console.ReadLine();

        startupAsyncResult.AsyncWaitHandle.WaitOne();

        Console.WriteLine("Shutting down...");
        IAsyncResult shutdownAsyncResult = Stop();

        Console.WriteLine("-----Press enter to exit.-----");
        Console.ReadLine();

        shutdownAsyncResult.AsyncWaitHandle.WaitOne();
    }

    #region Startup
    private IAsyncResult StartUp()
    {
        ServerPlatformSettings settings =
            new ServerPlatformSettings(
                APP_USER_AGENT,
                LOCALHOST,
                PORT,
                GRUU,
                GetLocalCertificate()
            );

        _platform = new CollaborationPlatform(settings);
        return _platform.BeginStartup(StartupCompleted, null);
    }

    private void StartupCompleted(IAsyncResult result)
    {
        _platform.EndStartup(result);

        Console.WriteLine("Started up platform.");
        UserEndpointSettings endpointSettings =
            new UserEndpointSettings(
                _mySipUri,
                OCS_SERVER,
                TLS_PORT
            );

        _endpoint = new UserEndpoint(_platform, endpointSettings);
        _endpoint.BeginEstablish(EstablishCompleted, null);
    }

    private void EstablishCompleted(IAsyncResult result)
    {
        _endpoint.EndEstablish(result);

        Console.WriteLine("Established endpoint.");

        SubscribeToPresence();
    }
    #endregion

    private void SubscribeToPresence()
    {
        // Code to do something vaguely useful goes here.
    }
    #region Shutdown

    private IAsyncResult Stop()
    {
        return _endpoint.BeginTerminate(TerminateCompleted, null);
    }

    private void TerminateCompleted(IAsyncResult result)
    {
        _endpoint.EndTerminate(result);

        Console.WriteLine("Terminated endpoint.");

        _platform.BeginShutdown(ShutdownCompleted, null);
    }

    private void ShutdownCompleted(IAsyncResult result)
    {
        _platform.EndShutdown(result);

        Console.WriteLine("Shut down platform.");
    }

    private static X509Certificate2 GetLocalCertificate()
    {
        X509Store store =
            new X509Store(StoreLocation.LocalMachine);

        store.Open(OpenFlags.ReadOnly);

        X509Certificate2Collection certificates =
            store.Certificates;

        foreach (X509Certificate2 certificate in certificates)
        {
            if (certificate.SubjectName.Name.Contains(
                Dns.GetHostEntry("localhost").HostName)
                && certificate.HasPrivateKey)
            {
                return certificate;
            }
        }

        return null;
    }
    #endregion

}
Our code is going to go in the SubscribeToPresence method. The first thing we need to do is choose the presence categories that we want to subscribe to. The only one we need for now is the state category, which is the one that contains availability information.
_endpoint.RemotePresence.PresenceSubscriptionCategories =
    new string[] { "state" };
The method to add subscription targets takes a collection of RemotePresentitySubscriptionTargets. We only have one target, but we still need to put it into a list.
RemotePresentitySubscriptionTarget target =
    new RemotePresentitySubscriptionTarget(_yourSipUri, null);

List targets =
    new List() { target };
And, last but not least, we need to call the BeginAddTargets method. We’ll create the AddTargetsCompleted callback method in a second.
_endpoint.RemotePresence.BeginAddTargets(
    targets, AddTargetsCompleted, null
);
The callback method is mind-numbingly simple. We just call the end method to finish the asynchronous operation, and then write a line to the console saying that we added the presence target. I’ll take a minute to note here that if you were adding proper error-handling, you’d want to put that end method call in a try-catch block, because any exception that occurs during the asynchronous execution of the operation will get thrown in your code when you call the end method.
private void AddTargetsCompleted(IAsyncResult result)
{
    _endpoint.RemotePresence.EndAddTargets(result);
    Console.WriteLine("Added presence target.");
}
Things are looking balmy so far. If you ran the application now, it would successfully subscribe to the presence of the user whose SIP URI you enter. The trouble is that it wouldn’t do anything helpful with the presence information. We need to add an event handler for the PresenceNotificationReceived event.
This can go in the SubscribeToPresence method, right before you instantiate the RemotePresentitySubscriptionTarget.
_endpoint.RemotePresence.PresenceNotificationReceived +=
    new EventHandler(
        RemotePresence_PresenceNotificationReceived
    );
In the event handler itself, things get a little dodgy. This is usually the case when XML parsing gets involved in the business. Bear with me.
void RemotePresence_PresenceNotificationReceived(object sender, RemotePresenceNotificationEventArgs e)
{
    foreach (RemotePresentityNotificationData
        notification in e.Notifications)
    {
        foreach (PresenceCategoryWithMetaData
            category in notification.Categories)
        {
            string xml = category.CreateInnerDataXml();

            if (xml != null && xml.Length > 0)
            {
                XmlDocument stateCategory = new XmlDocument();
                StringReader reader = new StringReader(xml);
                stateCategory.Load(reader);
                XmlNodeList availabilityNodeList =
                    stateCategory.GetElementsByTagName("availability");

                if (availabilityNodeList != null && availabilityNodeList.Count > 0)
                {
                    long availability =
                        Convert.ToInt64(availabilityNodeList[0].InnerText);

                    Console.WriteLine(
                        string.Format("Monitored user's presence changed to {0}",
                        availability)
                    );

                    ProcessAvailability(availability);
                }
            }
        }
    }
}
Here’s the story: in the event arguments for the PresenceNotificationReceived event, we get a collection of RemotePresentityNotificationData objects. Each of these has one set of presence categories for one Communicator user. Because we only subscribed to the state category, we’re assuming that all of the PresenceCategoryWithMetaData objects we get in the presence notifications represent state information. By calling CreateInnerDataXml on the PresenceCategoryWithMetaData object, we get the raw presence XML, which we can then rummage through to find the availability element. Once we’ve got our hands on that, it’s a simple matter of grabbing the number inside and doing something with it.
Here’s what we do with it:
private void ProcessAvailability(long busyness)
{
    if (busyness >= BUSY)
    {
        PublishAvailabilityAndNote(AVAILABLE, "Lounging on the beach");
    }
    else
    {
        PublishAvailabilityAndNote(BUSY, "Working incredibly hard");
    }
}
The availability values increase as availability decreases, so if the boss has an availability value of busy or greater, she’s probably not keeping tabs on us.
I covered the gritty details of publishing presence in my previous post, so again I’ll just give you the code here. The only important difference is that we’re publishing TWO categories here instead of just the one that we published before. The note category controls that bit of text that you can type in under your name in Communicator. The template for it is stored in a constant that I snuck into the code for the class that I gave you at the beginning of this post. Take a closer look if you’re curious about the format.
private void PublishAvailabilityAndNote(long availability, string note)
{
    string stateXml = String.Format(
        STATE_XML_FORMAT,
        availability
    );

    string noteXml = string.Format(
        NOTE_XML_FORMAT,
        note
    );

    CustomPresenceCategory customCategory =
        new CustomPresenceCategory("state", stateXml);

    CustomPresenceCategory noteCategory =
        new CustomPresenceCategory("note", noteXml);

    PresenceCategory[] categoriesToPublish =
        new PresenceCategory[] { customCategory, noteCategory };

    string presenceDescription = string.Format(
        "availability: {0}, note: {1}", availability, note
    );

    _endpoint.LocalOwnerPresence.BeginPublishPresence(
        categoriesToPublish,
        PublishPresenceCompleted,
        presenceDescription
    );
}

private void PublishPresenceCompleted(IAsyncResult result)
{
    _endpoint.LocalOwnerPresence.EndPublishPresence(result);

    Console.WriteLine(string.Format(
        "Changed my presence to ({0}).", result.AsyncState.ToString())
    );
}
With this final crowning touch, we’re all set. If you create a PresenceMonitor object and call its Run method in a console app, you can enter your SIP URI and the SIP URI to monitor (don’t forget to prefix both with sip:) and the application will do its work. Change the presence of the monitored user, and straight away your own presence will automatically respond, as you, meanwhile, watch YouTube videos while being fanned with palm fronds.
I’ll leave the question of where to prop up those 30″ flat-panel monitors on the beach to a future post.
Posted: March 4th, 2009 | Author: Michael | Filed under: OCS Development, UCMA 2.0 | No Comments »
One of the many useful features of the second version of the Unified Communications Managed API is its capability to publish presence through managed code. Using the methods of the LocalOwnerPresence instance attached to each endpoint, you can publish presence information in the form of XML in the five built-in presence categories provided by Office Communications Server: note, contactCard, calendarData, services, and state. You can also, if you choose, control which access control containers the presence information is published into. (The containers determine who gets to see the presence information; these are the groups that you assign people to by right-clicking them in Communicator and going to the Change Level of Access submenu.) If you like to live on the edge, you can even create your own custom presence categories, which you could use to publish information like your geographical location, subjects you can take customer calls about, the names of your pets,etc. You need to execute some stored procedures on the database used by OCS in order to actually put the categories into the running.
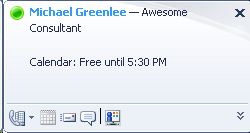
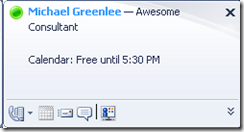
So,a few days ago I decided that “Available” didn’t quite do justice to my attitude; it seemed a bit mild and uninspired, especially with the dreary, foggy weather in Chicago. I wanted my Communicator availability to show more enthusiasm about how extremely available I am to come up with new uses for UCMA 2.0. With just a handful of lines of code, I published a bit of XML to my state presence category, causing me to show up in Communicator like this:
In order to publish the presence information, I had to start up a CollaborationPlatform, then establish a UserEndpoint (the type of endpoint you use in UCMA 2.0 if you want your code to act on behalf of a particular user), then publish the presence, and then terminate the endpoint and shut down the platform.
The block of XML that I used, stored in a constant, looks like this. The {0} represents a numeric availability code; the {1} represents the custom activity string that I want to publish.
private const string STATE_XML_FORMAT =
"<state xmlns="http://schemas.microsoft.com/2006/09/sip/state" " +
"xmlns:xsi="http://www.w3.org/2001/XMLSchema-instance" manual=" +
""true" xsi:type="userState">{0}" +
"{1}";
I also stuck the value for the “Available” level of availability (the green circle in Communicator) in a constant.
private const int AVAILABLE = 3500;
I’ll make a quick digression at this point to explain what’s going on with these availability codes.
There are four types of “state” that OCS aggregates together to determine what presence will show up next to your name in Communicator. Those four are user state (what you set yourself manually), machine state (how recently you did something on the computer, phone, device, or whatever), phone state (whether you are in a phone call or conference call), and calendar state (what’s on your calendar for the current time).
Ranges of availability codes correspond to different colors for the presence dot; for example, the 3xxx range gets you a green dot. 12xxx gets you a half-green, half-yellow dot. The availability codes have slightly different meanings for the different types of state. In machine state, 3500 means you are actively using the device. In calendar state, 3500 means that you are free according to your calendar at the current time.
You’ll notice in the XML above that the type of state we are publishing is user state. I’ve chosen to publish my state as “available,” using an availability code of 3500. I could have used any of the following:
- 3500 (Available)
- 6500 (Busy)
- 9500 (Do Not Disturb)
- 12500 (Be Right Back)
- 15500 (Away)
- 18500 (Offline)
The first step in publishing the presence information is starting up the CollaborationPlatform. To do this, I have to instantiate a ServerPlatformSettings object and pass it into the CollaborationPlatform constructor. Then I call BeginStartup on the new CollaborationPlatform.
public void Run()
{
Console.Write("Enter your SIP URI: ");
_sipUri = Console.ReadLine();
Console.Write("Enter the activity string you want to publish: ");
_activityString = Console.ReadLine();
ServerPlatformSettings settings = new ServerPlatformSettings(
APP_USER_AGENT,
LOCALHOST,
PORT,
GRUU,
GetLocalCertificate()
);
_platform = new CollaborationPlatform(settings);
_platform.BeginStartup(StartupCompleted, null);
}
Like most UCMA operations, starting up the CollaborationPlatform is asynchronous, so I’ve provided a callback delegate as the first parameter of the BeginStartup method. (The second parameter is an optional state object, which will be available in the AsyncState property of the IAsyncResult that I will get as a parameter of the callback delegate. I don’t use this here, since everything I need is stored in instance variables.)
You can force UCMA methods like this to execute synchronously (i.e., block the thread until they finish) by chaining together the begin and end methods, like so:
_platform.EndStartup(_platform.BeginStartup(StartupCompleted, null));
This is usually not a good idea, though, unless you are just testing something and want to keep it very simple. The best practice is to supply a callback delegate that will execute on a new thread whenever the UCMA operation completes. This is especially important if you want your application to be at all scalable.
The next step, in the callback method for BeginStartup, is to establish a UserEndpoint. First, though, we have to call EndStartup on the CollaborationPlatform. It’s important always to call the corresponding end method for any UCMA begin method you call. Usually you would want to wrap it in a try-catch block, because if an exception occurred during the asynchronous execution of the method, it will get thrown in your thread when you call the end method.
private void StartupCompleted(IAsyncResult result)
{
_platform.EndStartup(result);
Console.WriteLine("Started up platform.");
UserEndpointSettings endpointSettings = new UserEndpointSettings(
_sipUri,
OCS_SERVER,
TLS_PORT
);
_endpoint = new UserEndpoint(_platform, endpointSettings);
_endpoint.BeginEstablish(EstablishCompleted, null);
}
This is similar to the process for creating the CollaborationPlatform; we need a UserEndpointSettings object which we then pass into the UserEndpoint constructor. Once the endpoint is instantiated, we need to call BeginEstablish on it.
Once the endpoint finishes establishing, we’re ready to publish the presence.
The BeginPublishPresence method takes an array of PresenceCategory objects. PresenceCategory is an abstract class, with two derivatives: CustomPresenceCategory and PresenceCategoryWIthMetaData. The latter is what we would need to use if we wanted to specify things like which presence containers the presence information should go into. We would also have to use it if we were publishing presence for an ApplicationEndpoint.
In this case, we can use a CustomPresenceCategory to wrap the presence information. The constructor takes the category name (in this case, “state”) and the XML document.
private void EstablishCompleted(IAsyncResult result)
{
_endpoint.EndEstablish(result);
Console.WriteLine("Established endpoint.");
string stateXml = String.Format(
STATE_XML_FORMAT,
AVAILABLE,
_activityString
);
CustomPresenceCategory customCategory =
new CustomPresenceCategory("state", stateXml);
PresenceCategory[] categoriesToPublish =
new PresenceCategory[] { customCategory };
_endpoint.LocalOwnerPresence.BeginPublishPresence(
categoriesToPublish,
PublishPresenceCompleted,
null
);
}
Once the publish operation completes, we can clean up after ourselves by terminating the endpoint and shutting down the platform. The code to do this is really simple.
private void PublishPresenceCompleted(IAsyncResult result)
{
_endpoint.LocalOwnerPresence.EndPublishPresence(result);
Console.WriteLine("Published presence.");
_endpoint.BeginTerminate(TerminateCompleted, null);
}
private void TerminateCompleted(IAsyncResult result)
{
_endpoint.EndTerminate(result);
Console.WriteLine("Terminated endpoint.");
_platform.BeginShutdown(ShutdownCompleted, null);
}
private void ShutdownCompleted(IAsyncResult result)
{
_platform.EndShutdown(result);
Console.WriteLine("Shut down platform.");
}
If you run this code (make sure you are running it as an administrator, or you’ll get a TLS exception) it should publish the activity message you choose so that it shows up in Communicator beside your name.
Here is the complete code for my CustomActivityPublisher class.
using System;
using System.Collections.Generic;
using System.Linq;
using System.Text;
using Microsoft.Rtc.Collaboration;
using Microsoft.Rtc.Collaboration.Presence;
using System.Security.Cryptography.X509Certificates;
using System.Net;
namespace PresenceSample
{
public class CustomActivityPublisher
{
private const string STATE_XML_FORMAT =
"<state xmlns="http://schemas.microsoft.com/2006/09/sip/state"" +
" xmlns:xsi="http://www.w3.org/2001/XMLSchema-instance" manual=" +
""true" xsi:type="userState">{0}" +
"{1}";
private const int AVAILABLE = 3500;
private const string APP_USER_AGENT = ...
private const string LOCALHOST = ...
private const int PORT = ...
private const string GRUU = ...
private const string OCS_SERVER = ...
private const int TLS_PORT = 5061;
private string _sipUri;
private string _activityString;
private CollaborationPlatform _platform;
private UserEndpoint _endpoint;
public void Run()
{
Console.Write("Enter your SIP URI: ");
_sipUri = Console.ReadLine();
Console.Write("Enter the new activity string: ");
_activityString = Console.ReadLine();
ServerPlatformSettings settings =
new ServerPlatformSettings(
APP_USER_AGENT,
LOCALHOST,
PORT,
GRUU,
GetLocalCertificate()
);
_platform = new CollaborationPlatform(settings);
_platform.BeginStartup(StartupCompleted, null);
}
private void StartupCompleted(IAsyncResult result)
{
_platform.EndStartup(result);
Console.WriteLine("Started up platform.");
UserEndpointSettings endpointSettings =
new UserEndpointSettings(
_sipUri,
OCS_SERVER,
TLS_PORT
);
_endpoint = new UserEndpoint(_platform, endpointSettings);
_endpoint.BeginEstablish(EstablishCompleted, null);
}
private void EstablishCompleted(IAsyncResult result)
{
_endpoint.EndEstablish(result);
Console.WriteLine("Established endpoint.");
string stateXml = String.Format(
STATE_XML_FORMAT,
AVAILABLE,
_activityString
);
CustomPresenceCategory customCategory =
new CustomPresenceCategory("state", stateXml);
PresenceCategory[] categoriesToPublish =
new PresenceCategory[] { customCategory };
_endpoint.LocalOwnerPresence.BeginPublishPresence(
categoriesToPublish,
PublishPresenceCompleted,
null
);
}
private void PublishPresenceCompleted(IAsyncResult result)
{
_endpoint.LocalOwnerPresence.EndPublishPresence(result);
Console.WriteLine("Published presence.");
_endpoint.BeginTerminate(TerminateCompleted, null);
}
private void TerminateCompleted(IAsyncResult result)
{
_endpoint.EndTerminate(result);
Console.WriteLine("Terminated endpoint.");
_platform.BeginShutdown(ShutdownCompleted, null);
}
private void ShutdownCompleted(IAsyncResult result)
{
_platform.EndShutdown(result);
Console.WriteLine("Shut down platform.");
}
private static X509Certificate2 GetLocalCertificate()
{
X509Store store =
new X509Store(StoreLocation.LocalMachine);
store.Open(OpenFlags.ReadOnly);
X509Certificate2Collection certificates =
store.Certificates;
foreach (X509Certificate2 certificate in certificates)
{
if (certificate.SubjectName.Name.ToLower().Contains(
Dns.GetHostEntry("localhost").HostName.ToLower())
&& certificate.HasPrivateKey)
{
return certificate;
}
}
return null;
}
}
}