Posted: September 4th, 2011 | Author: Michael | Filed under: Lync Development, MSPL | Tags: Lync, MSPL, UCMA | 25 Comments »
One of the most useful (and most confusing) things you can do with Microsoft SIP Processing Language (MSPL) is change the routing behaviour of Lync Server. There are a variety of reasons why you might want to do this, but in this post I want to discuss a specific case: rerouting calls to a UCMA application. Continue reading “Rerouting requests to a UCMA application with MSPL” »
Posted: August 29th, 2011 | Author: Michael | Filed under: MSPL, UCMA 3.0, UCMA 4.0 | Tags: ApplicationEndpoint, MSPL, routing | 3 Comments »
UCMA 3.0 introduced the concept of a “default routing endpoint.” To put it very generally, a default routing endpoint is a single application endpoint that receives any messages that have nowhere else to go. I’ll illustrate further in a moment. When I first heard about this new feature, I could not understand what use it could possibly have. Gradually, over a period of months, situations came up where default routing endpoints turned out to be very handy. Since I figure that other folks might have the same initial reaction of complete confusion when hearing about the default routing endpoint feature, I thought I would write up a bit of explanation on this odd but useful creature in the hope that it will help in others’ development efforts. Continue reading “Default routing endpoints in UCMA” »
Posted: August 20th, 2011 | Author: Michael | Filed under: UCMA 3.0 | Tags: Replaces header, SIP, transfer | 3 Comments »
I once read about a psychology study which went like this: when the subjects showed up for the study, each one was sent to a desk to register, where he or she was greeted by a receptionist. The receptionist then reached down under the counter to get some papers, going out of sight. A COMPLETELY DIFFERENT PERSON wearing a different colour shirt stood up and continued the conversation. Most of the study subjects completely missed the switch, and when asked later about their check-in experience, said that they hadn’t noticed anything unusual.
This is the image that comes to mind when I think about call replacement. In a nutshell, the call replacement feature makes it possible to “switch out” participants in a call, just like the two receptionists in the psychology study. Call replacement is one of the most confusing, and therefore most underused, features in Lync. In this post, I’ll explain how it works, what it does behind the scenes, and why you would want to use it in your UCMA applications.
What It’s Good For
First of all, what’s the purpose of call replacement?
Let’s say you have a UCMA application which answers calls from customers and allows them to select the staff member they want to talk to. It then dials that person, announces the caller, and puts the caller through to the staff member.
One way to do this would be to call the staff member, play the announcement, hang up that call, and then transfer the customer over to the staff member, creating another call, much like in the diagram below.

The bothersome thing about this is that the staff member receives two calls, the first from the application and the second from the customer. Let’s look at another option that uses call replacement.

In this second scenario, we don’t hang up the call to the staff member. Instead, when we perform the transfer on the customer call, we tell it to replace the staff member call as part of the transfer. So when the customer calls the staff member, it includes an extra SIP header which contains information identifying the original staff member call. As a result, the customer “takes over” the UCMA application’s place in the call with the staff member. The staff member won’t see any new windows pop up, and won’t need to do anything. He or she will simply stop hearing the application and will start hearing the customer instead.
When you perform a call replacement, you replace an existing Lync call with a new call in a way that is seamless for the call recipient (in this case, the staff member). When I say “seamless,” what I mean is that the call stays active for the recipient, and no new windows pop up.
How It Works
In our example above, when the UCMA application transfers the customer call, it uses what’s called a “supervised” transfer. This is what it looks like in code:
audioVideoCall.BeginTransfer(callToReplace, OnTransferCompleted, audioVideoCall);
So, instead of passing a SIP URI into BeginTransfer, you are passing in a reference to an AudioVideoCall object.
When you initiate the transfer, this is what happens: first, the UCMA application sends a SIP REFER message to the transferee. In the example above, this is the customer. The REFER message contains a REFER-TO header, which is more or less like this:
REFER-TO: <sip:staff@contoso.com;opaque=user:epid:NbOC9Uuhobt7890l7UOEht980QhAAA;gruu?REPLACES=f048bd6d-2ece-4e39-88c7-4a50496d8492%3Bfrom-tag%3D893214e76a%3Bto-tag%3D539db20c4b>
In plain English, what this says is that the user receiving the REFER should call staff@contoso.com, at the specific endpoint specified. When it makes that call, it should include a REPLACES header identifying a specific call to be replaced.
The transferee then places a call to the transfer target, in this case staff@contoso.com. To initiate the call, it sends a SIP INVITE message. Into this INVITE message, it adds a REPLACES header like this:
REPLACES: f048bd6d-2ece-4e39-88c7-4a50496d8492;from-tag=D893214e76a;to-tag=539db20c4b
The REPLACES header contains three elements: a call ID (the first part), a from tag, and a to tag. These three elements uniquely identify a call (a SIP dialog, to be specific) between two endpoints that the new call should replace. All three can be found in the SIP messages that go into establishing the original call.
When Lync Server sees the REPLACES header, it does a sort of handoff, plugging in the new call where the replaced one was.
Call Replacement Without a Transfer
In UCMA, the easiest way by far to initiate a call replacement is through a supervised transfer. However, there’s no inherent reason why you need to do a transfer in order to replace a call. If you’re willing to manually add a REPLACES header to an outgoing call, you can “take over” another call from your application itself, as the diagram below illustrates. There’s one catch: you need to know those three pieces of information that go in the REPLACES header, namely the call ID, the from tag, and the to tag.

Why might you want to do this? For an example, imagine you have two UCMA applications running on separate servers. One is an interactive voice response (IVR) application which answers calls and asks automated questions to direct calls appropriately. The other is a phone directory which callers can be forwarded to from the IVR.
Since these are two separate processes running on separate servers, there needs to be some way to get calls from one to the other. You could do a simple transfer to the phone directory SIP URI, but if you do that you have no way of passing context between the two applications. To more smoothly hand over the call, you can have the second application carry out a call replacement, using the call ID, from tag, and to tag from the initial incoming call.
To get the call ID and tags, you can look at the return value from the EndEstablish or EndAccept method. The return value for both methods is an instance of CallMessageData. The CallMessageData class has a DialogContext property, and you can look at CallMessageData.DialogContext.CallID, CallMessageData.DialogContext.LocalTag, and CallMessageData.DialogContext.RemoteTag for the values. You can get the values when establishing the original call, and pass them to the other application by whatever method: a database table, a WCF service, or something else.
When doing the call replacement, you would put the values into the REPLACES header like this:
REPLACES:<CallID>;from-tag=<RemoteTag>;to-tag=<LocalTag>
To add the REPLACES header to a new outgoing call, you can use an instance of AudioVideoCallEstablishOptions:
// Build the establish options, including the extra header.

AudioVideoCallEstablishOptions options = new AudioVideoCallEstablishOptions();

options.Headers.Add(replacesHeader);


// Establish the call.

AudioVideoCall avCall = new AudioVideoCall(conversation);

avCall.BeginEstablish(destinationUri, options, OnEstablishCompleted, avCall);
Assuming the destination URI is the original caller, this will cause the second UCMA application to take the place of the first UCMA application with no interruption for the original caller.
Call Replacement and UCMA Workflow
If you try to use supervised transfers or call replacement in applications that use UCMA Workflow, you may run into problems. The most common reason for this is that in order for a supervised transfer to work, both participants must indicate that they support the REPLACES header; and UCMA Workflow defaults to disabling support for call replacement.
You can check support for REPLACES on any individual call by looking at the IsReplacesSupported property on AudioVideoCall:
if (avCall.IsReplacesSupported)

{

// Do a supervised transfer...

}
If you use a UCMA Workflow to answer an incoming call, and you want to use supervised transfers with that call, you will need to set the SupportsReplaces property on the AcceptCallActivity to true. You’ll need to do this before the call is actually accepted, because REPLACES support needs to be set when the call starts, so you may need to add a code activity to your workflow to set the property.
This is the first point to check if you have trouble with a supervised transfer in a UCMA Workflow application.
Conclusion
Call replacement can be a bit tricky to understand, but it has many uses in Lync, and allows you to do some things with UCMA applications that would otherwise be difficult, hacky, or impossible. It’s definitely worth taking some time to understand how it works behind the scenes and what you can do with it. Hopefully this post has given you an overview of how to use call replacement and what you can do with it. Please feel free to get in touch if you have any questions about anything I’ve described, or if you’d like to see more details in a follow-up post.
Posted: July 26th, 2011 | Author: Michael | Filed under: Lync Development, MSPL | Tags: Lync, MSPL | 3 Comments »
In my last post, I described some of the basics of Microsoft SIP Processing Language, or MSPL, using a simple script as an example. That last post ended with a cliffhanger: how does the MSPL script get installed on the Lync Front End Server?
Today, I’m going to answer that question. Continue reading “Installing and troubleshooting MSPL scripts” »
Posted: July 8th, 2011 | Author: Michael | Filed under: Lync Development, MSPL | Tags: Lync, MSPL | 24 Comments »
Recently I’ve taken a number of questions about customizing the routing of messages in Lync Server, which is possible with the Lync Server 2010 SDK. Since most of the how-to material out there is about either UCMA or the Lync 2010 (client) SDK, I thought I would write up a few articles on the basics of what you can do with the Lync Server 2010 SDK, and particularly with Microsoft SIP Processing Language, a.k.a. MSPL. Continue reading “Extending Lync Server routing with MSPL” »
Posted: June 22nd, 2011 | Author: Michael | Filed under: Lync Development, OCS Development | Tags: Lync, OCS, Office Communications Server | No Comments »
In writing applications to extend OCS or Lync — especially applications that mimic client functionality — I’ve run into a number of situations where the application has a user’s domain and username but needs to figure out the user’s SIP URI in order to perform OCS/Lync operations on behalf of that user. There is not much documentation out there on how to do this, and it’s hard to find. So I wanted to write up a quick explanation of how to look up the SIP URI of a given domain account from Active Directory.
I’ll start with a couple of notes. First, it’s true that some organizations by convention use a SIP URI format that makes it easy to derive the SIP URI from the username with a bit of string manipulation. For instance, if all users have SIP URIs of the form sip:username@fabrikam.com, the application can put together the SIP URI itself by concatenating the username with “@fabrikam.com”. Also, in many cases SIP URIs by convention are the same as email addresses with sip: added to the front. If this is the case, an application that has the email address of the user can simply add sip: to produce the SIP URI.
The important thing to note is that while some organizations use these SIP URI formats by convention, there is nothing to prevent an administrator from giving a user a completely different SIP URI. If you are creating an application that needs to work in environments besides your own, it is potentially dangerous to assume that all SIP URIs will follow a consistent format like the ones described above.
This isn’t a huge deal, because retrieving SIP URIs for users, assuming you can connect to Active Directory to do an LDAP query, is relatively simple. The SIP URI for a user (at least, for users who are UC-enabled and have SIP URIs assigned) is stored in the msRTCSIP-PrimaryUserAddress property. There are plenty of articles out there on the Internet describing how to retrieve information from Active Directory, so I won’t go into all the details here, but you can use code that looks something like this:
public string GetSipUri(string cn, string ou)
{
 DirectoryEntry entry = new DirectoryEntry(
  "<a href="ldap://dc.fabrikam.com/cn">LDAP://dc.fabrikam.com/cn</a>=" + cn + ", ou=" + ou +
  ", dc=fabrikam, dc=com");

 PropertyCollection properties = entry.Properties;
 return properties["msRTCSIP-PrimaryUserAddress"].ToString();
}
You’ll need to reference System.DirectoryServices to do this. Basically what you are doing is retrieving the object representing the user via LDAP, and grabbing the msRTCSIP-PrimaryUserAddress property from that object.
If you want to do the reverse of this (look up the username based on a SIP URI) you can use the DirectorySearcher object, with a search filter like the following:
searcher.Filter = "(&(objectClass=user)(msRTCSIP-PrimaryUserAddress=sip:michael@fabrikam.com))";
Feel free to get in touch if you have any questions!
Posted: May 23rd, 2011 | Author: Michael | Filed under: Lync Development | No Comments »
The book on Lync development that George Durzi and I wrote over the past 9 months or so is finally available! It covers the Lync client APIs, UCMA 3.0 Core, and UCMA 3.0 Workflow. As more and more people use these Lync’s extensibility platform, we hope it will be useful as an overview of the core concepts and a guide for common development scenarios.
You can find it on Amazon here.

Posted: December 7th, 2010 | Author: Michael | Filed under: Lync Development, UCMA 3.0 | 3 Comments »
From time to time, someone asks me whether there is a way to move a call from one Lync conference to another using UCMA. In other words, they want their UCMA application to be able to take someone who is connected to Conference A, and cause that person to suddenly be connected to Conference B.
Now, whenever I’m explaining a concept and I start having to talk about Thing A, Thing B, Thing C, and so forth, I begin to feel that a diagram is in order. So here’s the idea in simple pictures with little blue people. Say Frank is on a conference, Conference A. There’s another conference, Conference B, which Frank is not connected to. Both of these conferences are owned by a UCMA application,which is also participating in both of them.
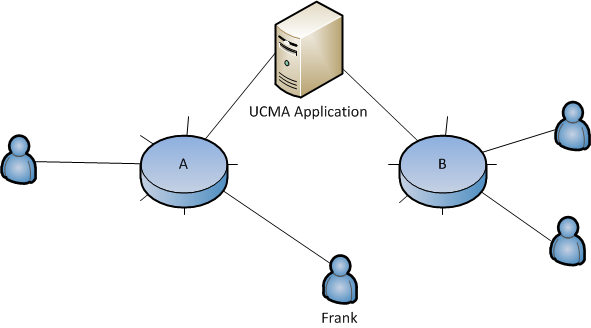
We want the application to somehow transfer Frank from Conference A to Conference B. Frank shouldn’t have to click anything or answer a new incoming call. Lync should simply take the call between Frank and Conference A,and turn it into a call between Frank and Conference B:

This might seem like a bizarre thing to do, so let me take a bit of a break and mention a few examples of scenarios where this would be useful.
Example Scenarios
For one, Frank might be a contact center agent who has been talking to a customer and has just finished the call. Instead of letting Frank go on break right away, we want to connect him to a supervisor who has been monitoring the call so the supervisor can give him feedback. Or maybe we just want to keep him connected to an empty conference; some contact centers like to keep agents “off hook” as long as they are logged in.
Another possibility is that one of the conferences might be serving as a “holding zone” for callers who are waiting to be connected to someone or to some other part of the application, sort of like a more advanced version of the Lync conference lobby.
So, the next question is: how do we do it?
The Trouble With Transfers
The difficulty that always comes up in situations like these is that an application can’t control calls that belong to remote conference participants. Let me illustrate with another beautiful diagram.
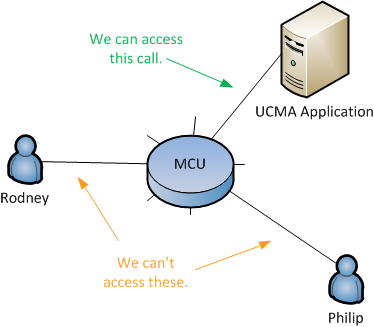
The UCMA application here has created a conference and invited two other participants, Rodney and Philip. I’m simplifying a bit in this diagram, because the conference focus is involved as well, but the principle is the same regardless. Now, you might think, because the UCMA application has started a conference using the ConferenceSession class, that the conference is hosted by the UCMA application, and that Rodney and Philip are calling into the application in order to join the conference. If so, you have been deceived. What’s actually happening is that the UCMA application has a call with the audio/video MCU, and Rodney and Philip also have their own calls with the MCU.
Because the UCMA application is the conference owner, it can tell the MCU to do things by sending commands to it (and if the application has joined as a trusted participant, it can send even more commands), but the UCMA application itself has no direct access to the call between Rodney and the conference MCU, nor the call between Philip and the conference MCU. There is no way for the application to get a handle to those calls in the form of a Call object.
The solution is simple. There is a class, new to UCMA 3.0, which allows your application to greedily keep control of other people’s calls.
Making Calls “Moveable” With the BackToBackCall Class
By connecting each remote participant to the conference using a BackToBackCall, the application can maintain control of SIP signaling for the call. There’s plenty of information out there on the BackToBackCall class and its shenanigans, but to sum it up briefly, with a BackToBackCall, the application acts as a proxy for all SIP signaling between two remote participants (in this case, a user and a conference), while the media flows directly between the two points.
Here’s an incoming audio call event handler that creates a new ad hoc conference and connects the caller to the conference using a BackToBackCall:
private void OnAudioVideoCallReceived(object sender, CallReceivedEventArgs args)
{
    _logger.Log("Incoming call.");

    // Create a conversation to use to join the ad hoc conference.
    Conversation conferenceConversation = new Conversation(_endpoint);

    // Join the conference.
    conferenceConversation.ConferenceSession.BeginJoin(
        null as ConferenceJoinOptions,
        ar =>
        {
            // Create a call into the conference. This will be call leg 2.
            _conferenceCallLeg =
                new AudioVideoCall(conferenceConversation);

            // The incoming call will be call leg 1.
            _incomingCallLeg = args.Call;

            // Create the settings for the back to back call.
            BackToBackCallSettings settings1 =
                new BackToBackCallSettings(_incomingCallLeg);

            BackToBackCallSettings settings2 =
                new BackToBackCallSettings(_conferenceCallLeg, _destinationSipUri);

            // Create and establish the back to back call.
            BackToBackCall b2bCall = new BackToBackCall(settings1, settings2);

            try
            {
                _logger.Log("Establishing back to back call...");

                // Establish the back to back call.
                b2bCall.BeginEstablish(
                    ar2 =>
                    {
                        try
                        {
                            b2bCall.EndEstablish(ar2);

                            _logger.Log("Established back to back call.");

                            // Wait for 5 seconds.
                            Thread.Sleep(5000);

                            _logger.Log("Transferring the call into a new conference...");

                            TransferIntoNewConference();
                        }
                        catch (RealTimeException ex)
                        {
                            _logger.Log("Failed establishing a back to back call.", ex);
                        }
                    },
                    null);
            }
            catch (InvalidOperationException ioex)
            {
                    _logger.Log("Failed initiating a back to back call.", ioex);
            }
        },
        null);
}
In the first method, the application creates a second ad hoc conference and joins it as a participant. Next, in the EstablishAudioCallInNewConference method, it transfers the original incoming call into the new conference. The caller gets pulled out of Conference A and transferred straight into Conference B, without having to do anything in the Lync client.
Now, keep in mind that this process is not repeatable. When you transfer the call using AudioVideoMcuSession.BeginTransfer, you are pulling it out of the back-to-back arrangement, and your application will no longer have a handle to the call. The Call object you have will go into the Terminated state and the caller will once again become a remote participant, completely out of your grasp.
There is a way to retain control of the call after doing a transfer like this, using a strange technique known as the self-transfer. But I’ll have to leave that to a future post.
Meanwhile, if you’re interested in topics like this, be sure to keep an eye out for my upcoming book, co-authored with George Durzi, Professional Unified Communications Development with Microsoft® Lync™ Server 2010. It’s scheduled for release in May.
Posted: June 22nd, 2010 | Author: Michael | Filed under: Lync Development, UCMA 3.0 | 2 Comments »
Manual audio routes before UCMA 3.0
One of my favorite new features in UCMA 3.0, the new version of the Unified Communications Managed API that goes with Lync Server 2010, is the interfaces that give developers control over audio routing within an audio/video MCU session. To say that again in English: in UCMA 3.0, you can tell the component that handles mixing the audio for the conference that Participants A, B, and C should hear the audio from your application, but Participants X, Y, and Z should not hear it.
Huh?
Okay, let’s take an example scenario. You are a supervisor at Company X, responsible for ten switchboard operators who answer calls to your main business number. Every so often, you like to listen in on calls,to make sure nothing untoward is happening in those switchboard phone conversations. Thanks to the technique for adding invisible conference participants detailed in my last post,you can slip on and off of those calls without anyone hearing creepy breathing sounds.
But what if you are listening on a call and one of those agents starts doing something odd, like transferring a telemarketer to the CEO’s private extension, endangering your hard-earned reputation? It would be nice if you could “whisper” something to the agent at that moment that the caller could not hear, such as “#&^@$(!!!!!”
Well, as it happens, with UCMA 3.0 you can.
Example two: you are setting up a phone system for one of those busy medical practices where any time you call, they answer the phone with “Dr. Smith’s office, please hold,” and you spend the next five minutes listening to the same light jazz tune and blurbs about allergy medicine. You need to play hold music so the caller doesn’t think they’ve been hung up on, but those poor office assistants shouldn’t have to listen to an endless repetition of Light Jazz Tune in the headsets on their ears while finishing the last lines of Form 41270501251253523152-FTA-4-X.
Using UCMA 3.0, you can turn the call into a conference and pipe the hold music to just one participant.
Let’s take a look at how this works in code.
It’s been a while since I covered the basics of getting a UCMA application up and running, and we’re talking about the new and improved UCMA 3.0, so let’s begin at the beginning.
Open Visual Studio and create a new project. Remember when starting Visual Studio to run it with administrator permissions by right-clicking on Visual Studio and choosing Run as administrator. Once the project is created, add references to Microsoft.Rtc.Collaboration (for UCMA) and to System.Configuration (so we can get settings from an App.config file)
Next, you can create a new class, AudioRouteTester, to hold the code for our sample application. Go ahead and stick the following instance variables at the beginning of the class.
CollaborationPlatform _platform;
ApplicationEndpoint _endpoint;
Conversation _conferenceConversation;
AudioVideoCall _conferenceAudioCall;
Player _musicPlayer;
WmaFileSource _musicSource;
IAsyncResult _musicSourcePrepareAsyncResult;

string _user1Uri = ConfigurationManager.AppSettings["userWhoHearsMusic"];
string _user2Uri = ConfigurationManager.AppSettings["userWhoDoesNotHearMusic"];
As an entry point for our tester class, we’ll create a Start method that starts up the collaboration platform and establishes an application endpoint.
public void Start()
{
    // Get the application ID from App.config.
    string applicationId = ConfigurationManager.AppSettings["applicationId"];

    // Create the settings object we'll use for the platform.
    ProvisionedApplicationPlatformSettings platformSettings =
        new ProvisionedApplicationPlatformSettings("audioRoute", applicationId);

    // Create the collaboration platform.
    _platform = new CollaborationPlatform(platformSettings);

    // Start it up as an asynchronous operation.
    _platform.BeginStartup(OnPlatformStartupCompleted, null);

    Console.WriteLine("Starting up platform...");
}
What we’re doing here is taking advantage of the fancy new application provisioning in UCMA 3.0. You can provide nothing but the application ID for a trusted application you’ve provisioned, and UCMA 3.0 will figure out the rest.
Let’s take a break here to talk about asynchronous methods, for those who are just joining us. Nearly every method in UCMA is asynchronous, so it’s important to understand how the pattern works.
Operations in UCMA consist of a Begin method, which initiates the asynchronous operation, and an End method, which finishes it and returns the return value, if any, and throws exceptions that have occurred during the operation, if any. Every Begin method has two parameters, userCallback and state, that tell the UCMA runtime what to do when the asynchronous operation finishes.
The userCallback parameter is a method that the runtime will invoke when the operation finishes; that callback method should take a single IAsyncResult as a parameter and have no return value, and it should call the corresponding End method, passing in the IAsyncResult.
The state parameter is an object that is passed back to the callback method when it is called. It is accessible through the AsyncState property on the IAsyncResult, and you will need to cast it back to its original type. The async state is useful for keeping track of the object you need to call the End method on, or for keeping track of other context on the operation.
Now, there is another clever way to provide the callback methods that largely removes the need for the async state. If you pass an anonymous delegate or lambda expression to the Begin method as the userCallback parameter, you can refer to local variables from the context in which Begin is called from within the delegate. This concept may be familiar to you as a “closure”; if not, you’ll see an example later.
And now, back to our regularly scheduled programming.
We need to define the callback method for the platform startup. Here it is:
void OnPlatformStartupCompleted(IAsyncResult result)
{
    // This is where we pass the IAsyncResult into
    // the End method for our asynchronous operation.
    _platform.EndStartup(result);

    Console.WriteLine("Platform started.");

    // Prepare the WMA file source for the music.
    _musicSource = new WmaFileSource(ConfigurationManager.AppSettings["wmaFilePath"]);
    _musicSourcePrepareAsyncResult =
        _musicSource.BeginPrepareSource(MediaSourceOpenMode.Buffered, OnPrepareSourceCompleted, null);

    Console.WriteLine("Preparing music...");

    // Get the application endpoint details from App.config.
    string contactUri = ConfigurationManager.AppSettings["endpointUri"];
    string csFqdn = ConfigurationManager.AppSettings["proxyServerFqdn"];

    // Create the application endpoint settings object.
    ApplicationEndpointSettings endpointSettings = new ApplicationEndpointSettings(
        contactUri, csFqdn, 5061);

    // Create the endpoint.
    _endpoint = new ApplicationEndpoint(_platform, endpointSettings);

    // Establish it asynchronously.
    _endpoint.BeginEstablish(OnEndpointEstablishCompleted, null);

    Console.WriteLine("Establishing endpoint...");
}
Nothing particularly extraordinary here. Creating and establishing the application endpoint works just as it did in UCMA 2.0. There is a way to “auto-discover” endpoints that belong to your trusted application, but that is a topic for another article. This code also begins preparing a WMA file source that we will use later to pipe music into the call. We’re storing the IAsyncResult in an instance variable so we can check later to ensure that the file source has finished preparing itself.
Here are another couple of callbacks we need. First, we have a very simple callback method for the preparation of the WMA file source; then we have a callback for the establishing of the endpoint.
void OnPrepareSourceCompleted(IAsyncResult result)
{
    try
    {
        _musicSource.EndPrepareSource(result);
        Console.WriteLine("Music prepared.");
    }
    catch (RealTimeException ex)
    {
        // Catch and handle exceptions.
        Console.WriteLine(ex);
    }
}

void OnEndpointEstablishCompleted(IAsyncResult result)
{
    try
    {
        _endpoint.EndEstablish(result);

        Console.WriteLine("Endpoint established.");

        JoinConference();
    }
    catch (RealTimeException ex)
    {
        // Catch and handle exceptions.
        Console.WriteLine(ex);
    }
}
Once we’ve finished establishing the endpoint, we have a basic UCMA application running, and we’re ready to do something a bit more exciting. The excitement begins in a method called JoinConference. We’ll take a look at that method in just a second, but first, let’s go over what exactly we’re planning.
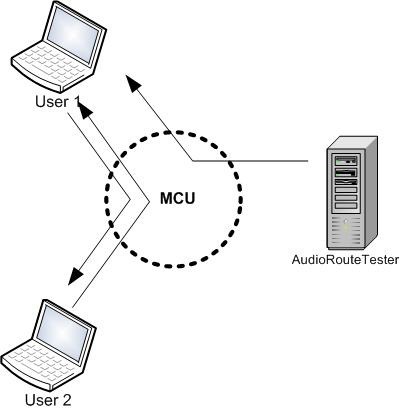
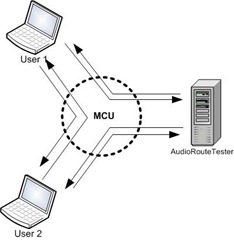
This manual audio route handling only works for conferences, because what we are doing is telling the audio/video MCU, or multipoint control unit (the OCS service that mixes audio and video for conference participants), to create a separate, special mix for certain participants. So we’re going to need to create a conference, and invite some participants so we can test out our audio routing on them. We’ll stick to two participants for now.
By default, the MCU sends audio from all conference participants to all other participants, as shown below.
We’ll send the MCU a command telling it to remove our application from that default routing, so the MCU will stop sending audio from our application to other conference participants (and from other conference participants to our application).

We’ll then add a manual audio route that sends audio from our application to just one of the conference participants, and play some music to that conference participant that the other participant cannot hear.

Here’s the JoinConference method:
private void JoinConference()
{
    // Create a new conversation which we will use to join an ad hoc conference.
    _conferenceConversation = new Conversation(_endpoint);

    // Join a new ad hoc conference. Note that we're joining as a
    // trusted participant by specifying the join mode.
    _conferenceConversation.ConferenceSession.BeginJoin(
        new ConferenceJoinOptions() { JoinMode = JoinMode.TrustedParticipant },
        // Here's one of those lambda expression callbacks I mentioned!
        // It's a bit more concise this way.
        ar =>
        {
            try
            {
                _conferenceConversation.ConferenceSession.EndJoin(ar);

                Console.WriteLine("Conference joined.");

                // Now that we've joined the conference, add the audio modality
                // by establishing a new call.
                _conferenceAudioCall = new AudioVideoCall(_conferenceConversation);
                _conferenceAudioCall.BeginEstablish(OnCallEstablished, null);
            }
            catch (RealTimeException ex)
            {
                // Catch and handle exceptions.
                Console.WriteLine(ex);
            }
        },
        null);
}
Rather than scheduling a conference and then joining it using the resulting conference URI, we simply join an ad hoc conference by calling BeginJoin on the conversation object’s conference session. We use one of the properties on ConferenceJoinOptions to specify that we are joining as a trusted participant. There are two reasons for doing this:
- The application won’t show up as a participant in the conference roster.
- The application will have permission to give commands to the MCU about audio routes.
Once we’ve joined the conference, we also need to add the audio modality on the conference by establishing an audio call for the conference conversation.
Now we’re ready to start the music and begin playing around with audio routes.
void OnCallEstablished(IAsyncResult result)
{
    try
    {
        _conferenceAudioCall.EndEstablish(result);
    }
    catch (RealTimeException ex)
    {
        // Catch and handle exceptions.
        Console.WriteLine(ex);
        return;
    }

    Console.WriteLine("Audio call established.");

    // Subscribe to be notified when participants join or leave the A/V MCU session.
    _conferenceConversation.ConferenceSession.AudioVideoMcuSession.ParticipantEndpointAttendanceChanged +=
        new EventHandler<ParticipantEndpointAttendanceChangedEventArgs>(
            AudioVideoMcuSession_ParticipantEndpointAttendanceChanged);

    // Make sure the WMA file source is ready by
    // blocking on the async wait handle.
    _musicSourcePrepareAsyncResult.AsyncWaitHandle.WaitOne();

    // Create a new Player object to pipe the music
    // into the audio call. Set its source to the one
    // we've prepared and attach it to the call.
    _musicPlayer = new Player();
    _musicPlayer.SetSource(_musicSource);
    _musicPlayer.SetMode(PlayerMode.Automatic);
    _musicPlayer.AttachFlow(_conferenceAudioCall.Flow);
    _musicPlayer.Start();

    AudioVideoMcuSession avMcu = _conferenceConversation.ConferenceSession.AudioVideoMcuSession;

    // Remove the application from the default audio routing for the MCU.
    avMcu.BeginRemoveFromDefaultRouting(_conferenceConversation.ConferenceSession.AudioVideoMcuSession.GetLocalParticipantEndpoints().First(),
        new RemoveFromDefaultRoutingOptions() { Duration = 3600000 },
        OnRemoveFromDefaultRoutingCompleted, null);
}
We’re subscribing to the ParticipantEndpointAttendanceChanged event on the audio/video MCU session so that we’ll know when the user who is supposed to hear the music joins the conference. Once the music player is started, we remove the application from the default audio routing. We do this by calling the BeginRemoveFromDefaultRouting method on the audio/video MCU session, and passing in the ParticipantEndpoint object that represents our application’s endpoint.
Notice that we’ve specified a duration in RemoveFromDefaultRoutingOptions. Once the duration expires, the endpoint in question will be returned to the default routing automatically, so it’s wise to set this high if you don’t want participants getting dumped back into default routing.
Now we’re all set to invite some participants. The ConferenceInvitation class is new to UCMA 3.0 and makes sending conference invitations through code somewhat more intuitive.
void OnRemoveFromDefaultRoutingCompleted(IAsyncResult result)
{
    AudioVideoMcuSession avMcu = _conferenceConversation.ConferenceSession.AudioVideoMcuSession;

    try
    {
        avMcu.EndRemoveFromDefaultRouting(result);
    }
    catch (RealTimeException ex)
    {
        // Catch and handle exceptions.
        Console.WriteLine(ex);
        return;
    }

    // Create conference invitation objects for the two users.
    ConferenceInvitation user1Invitation = new ConferenceInvitation(_conferenceConversation);
    ConferenceInvitation user2Invitation = new ConferenceInvitation(_conferenceConversation);

    // Deliver the invitations. More of those concise lambda expression callbacks!
    user1Invitation.BeginDeliver(_user1Uri, ar =>
        {
            user1Invitation.EndDeliver(ar);
            Console.WriteLine("Conference invitation delivered to user 1.");
        }, null);

    user2Invitation.BeginDeliver(_user2Uri, ar =>
        {
            user2Invitation.EndDeliver(ar);
            Console.WriteLine("Conference invitation delivered to user 2.");
        }, null);
}
If we left things at this point, we would play the music from our application but neither person in the conference would be able to hear it, because we’ve removed the application completely from audio routing:

We need to add a new audio route for one of the participants.
We’ll wait for that user to join and add the route at that point.
void AudioVideoMcuSession_ParticipantEndpointAttendanceChanged(object sender, ParticipantEndpointAttendanceChangedEventArgs e)
{
    // We'll only check the users that join; we're not as interested in when they leave.
    foreach (KeyValuePair pair
        in e.Joined)
    {
        Console.WriteLine("{0} joined conference", pair.Key.Participant.Uri);

        // The user we want to watch for is User 1, the one that should hear the music.
        if (pair.Key.Participant.Uri == _user1Uri)
        {
            // We create a new outgoing audio route for this user.
            // We're adding the route, not deleting it, so the RouteUpdateOperation is Add.
            OutgoingAudioRoute musicRoute = new OutgoingAudioRoute(pair.Key);
            musicRoute.Operation = RouteUpdateOperation.Add;

            // The method takes a list of audio routes.
            List outgoingRoutes = new List() { musicRoute };

            Console.WriteLine("Updating audio routes for user 1...");

            // This is where we actually update the audio routes. If there were
            // incoming routes to set, those would be the second parameter.
            _conferenceAudioCall.AudioVideoMcuRouting.BeginUpdateAudioRoutes(outgoingRoutes, null,
                ar =>
                {
                    try
                    {
                        _conferenceAudioCall.AudioVideoMcuRouting.EndUpdateAudioRoutes(ar);
                        Console.WriteLine("Updated audio routes for user 1.");
                    }
                    catch (RealTimeException ex)
                    {
                        // Catch and handle exceptions.
                        Console.WriteLine(ex);
                    }
                }, null);
        }
    }
}
To set up the manual audio route, we create an OutgoingAudioRoute object, passing in the participant who should receive the audio in the constructor. There is also an IncomingAudioRoute class we could use if we wanted to set up a route in the other direction. By default, the OutgoingAudioRoute object represents adding an audio route to the specified participant, but you can also remove audio routes you’ve previously defined by changing the value of the Operation property to RouteUpdateOperation.Remove.
The AudioVideoCall class in UCMA 3.0 has a new property called AudioVideoMcuRouting. This property holds a class that handles manual audio routes for that call. By calling BeginUpdateAudioRoutes and passing in a collection of OutgoingAudioRoute objects and a collection of IncomingAudioRoutes (or just one of the two), you can tell the MCU what to do with the audio from this call.
Here’s what the MCU is doing now:

We’re almost ready to go. Let’s add a few more things to finish up the application, such as a Stop method to terminate the endpoint and shut down the platform.
public void Stop()
{
    _endpoint.BeginTerminate(OnEndpointTerminateCompleted, null);
    _musicSource.Close();

    Console.WriteLine("Terminating endpoint...");
    Console.WriteLine("Closed music source.");
}

void OnEndpointTerminateCompleted(IAsyncResult result)
{
    try
    {
        _endpoint.EndTerminate(result);
    }
    catch (RealTimeException ex)
    {
        // Catch and handle exceptions.
        Console.WriteLine(ex);
    }

    Console.WriteLine("Terminated endpoint.");

    _platform.BeginShutdown(OnPlatformShutdownCompleted, null);

    Console.WriteLine("Shutting down platform.");
}

void OnPlatformShutdownCompleted(IAsyncResult result)
{
    try
    {
        _platform.EndShutdown(result);
    }
    catch (RealTimeException ex)
    {
        // Catch and handle exceptions.
        Console.WriteLine(ex);
    }

    Console.WriteLine("Shut down platform.");
}
You’ll need to add something like this to Program.cs to get your application to run:
AudioRouteTester sample = new AudioRouteTester();
sample.Start();

Console.WriteLine("Press any key");
Console.ReadLine();

sample.Stop();
And, finally, you’ll need an App.config file. Change the settings to match your own environment and trusted application. I’ve borrowed the WMA file used by the AutomaticCallDistributor sample in the UCMA SDK, but you can use any WMA file.
<?xml version="1.0"?>

    <add key="applicationId" value="urn:application:audioroutetest"/>
    <add key="proxyServerFqdn" value="cs-se.fabrikam.com"/>
    <add key="endpointUri" value="sip:audioroutes@fabrikam.com"/>
    <add key="userWhoHearsMusic" value="sip:michaelg@fabrikam.com"/>
    <add key="userWhoDoesNotHearMusic" value="sip:pa@fabrikam.com"/>
    <add key="wmaFilePath" value="I_Ka_Barra.wma"/>

  <supportedRuntime version="v2.0.50727"/>
At this point, you can run your application and see manual audio routes in action. The application will create a conference and invite two users; one user will hear music, the other won’t. Both users will be able to hear each other.
This is not perhaps the most practical application of audio routes. Only two uses of our sample application come to mind:
- Listening to calming music while taking calls from challenging customers.
- Confusing people by playing music to them that others on the call cannot hear. (“Guys, what is that music in the background? Does someone have a radio on?” “What music? I don’t hear any music, Bob.” “Yeah, Bob, I don’t hear it either…”)
You may be wondering, given what I’ve shown you, how it would work if you wanted to set manual audio routes for the audio coming from other participants on your call, not the audio coming from your application. For example, how would you do what’s diagrammed below?

The answer is that you can do this with a BackToBackCall; I’ll cover this in detail in a future post.
One other note: it is a good idea to “clean up” your manual audio routes if you decide to return a participant to the default audio routing. You can do this using that same BeginUpdateAudioRoutes method, but passing in OutgoingAudioRoute and IncomingAudioRoute objects with an Operation of RouteUpdateOperation.Remove.
As usual, I expect you to use this knowledge I have imparted to you for the greater good of humanity, and not for spooking people with weird noises on their important phone calls.
Feel free to write if you have any questions!
Posted: February 21st, 2010 | Author: Michael | Filed under: OCS Development, UCMA 2.0 | 1 Comment »
 Many of you, since encountering OCS 2007 R2 and its trusty sidekick server-side API, UCMA 2.0, have been wondering, “How do I spy on people and secretly record their audio conferences?”
Luckily for you, to complement its delightfully straightforward automation of SIP messaging, UCMA 2.0 has a rich array of covert operations functionality.
That may be a slight exaggeration. What it does provide is a way for server-side applications to perform a “trusted conference join.” A UCMA 2.0 application running as a trusted service which has authenticated with the OCS server by means of a certificate can join a conference invisibly, meaning it does not show up in the roster of conference participants.
Although I was tempted to title this article “Wiretapping in UCMA 2.0,” the trusted conference join feature has many uses. It allows you to create applications that provide services to OCS conferences without causing distracting and tacky-looking bots to appear in the list of participants. Some examples:
- Recording conversations for auditing, monitoring, or training purposes
- Conference timekeeping for businesses that bill by the minute
- Piping music or audio announcements into a conference
- Silent monitoring of conferences for training purposes
- Scaring people in a conference by suddenly saying something when they didn’t know you were there
So how do you do it?
First of all, your application needs to be using an application endpoint rather than a user endpoint. User endpoints cannot join conferences as a trusted participant.
When you call the BeginJoin method on the ConferenceSession object to join a conference,you can supply a ConferenceJoinInformation object with the URI of the conference you want to join. This ConferenceJoinInformation object also has a property called IsTrustedJoin. When this property is set to true,your application endpoint will join the conference as a trusted participant.
Let’s say you are joining a conference that has already started, and you have the conference URI stored in a local variable. You would do something like this:
// Create a ConferenceJoinInformation object with the conference URI
ConferenceJoinInformation joinInfo = new ConferenceJoinInformation(
    new Microsoft.Rtc.Signaling.RealTimeAddress(conferenceUri));

// Make this a trusted join
joinInfo.IsTrustedJoin = true;

// Create a new conversation
conversation = new Conversation(_applicationEndpoint);

// Use the conversation to join the conference
conversation.ConferenceSession.BeginJoin(joinInfo,
    result =>
    {
        conversation.ConferenceSession.EndJoin(result);
    },
    null);
First, you create a new instance of ConferenceJoinInformation, passing in the conference URI. In order for the constructor to like it, you need to turn the string that contains the URI into a RealTimeAddress object.
Next, you set the IsTrustedJoin property to true.
Finally, you create a new conversation and call the BeginJoin method, passing in the join information.
When the asynchronous operation completes, your application will be a participant in the conference, sending and receiving media like any other, but it will be INVISIBLE.
There is one other point I want to call out here before concluding. If you want to have more than one of these invisible participants from the same application (e.g. one to record and one to make animal noises) you can do this, on two conditions: you will need to create a Conversation object for each participant, and you will need to impersonate a fake URI so that the participants have different URIs.
To do this, you use the Impersonate method on the Conversation object, as below:
// Create a new conversation with impersonation
conversation = new Conversation(_applicationEndpoint);
conversation.Impersonate("RandomSounds@____________.com",
    "tel:+15555551212", "Random Sounds");
The URI you use can be completely fabricated; it doesn’t need to be a real contact.
This technique can be especially handy when combined with a back-to-back user agent (B2BUA) to proxy remote users into a conference invisibly. More on this in a future post if there is interest.
I take no responsibility for any imprudent or illegal things you do with trusted conference participants!