Adding custom menu items to the Lync client
Posted: November 6th, 2011 | Author: Michael | Filed under: Lync Development | Tags: client, context, context menu, Lync | 19 Comments »One of the areas in which Lync can really streamline communication is in handling context. The term “contextual conversations” comes up a lot in reference to Lync, and for good reason. In traditional communication media, a lot of time tends to be wasted while one person or the other looks for necessary information, documents, or tools that are relevant to the topic at hand. As Lync becomes more and more integrated into people’s workflows, it can automate much of this sending and retrieval of appropriate context, saving time and increasing productivity.
In this post, I want to discuss one of the ways in which the Lync UI can be customized to help offer contextual options that are specific to your own business needs: by creating custom menu items.
If you’ve used the Lync client at all, you’ve probably made use of the context menus that let you click on a contact (either in Lync itself, or in another application, such as Outlook, that has the Lync presence controls), and choose one of the options for initiating a conversation. Depending on how you initiate the conversation, some contextual information, such as the title of an email, may go along with it. What you may not know is that you can actually add your own options to these menus, and use them to create additional forms of context that users can send back and forth.
Step one for adding a custom menu item is creating an entry in the registry. The entry goes in a slightly different place depending on whether you’re on a 32-bit machine or a 64-bit machine:
32-bit: HKEY_LOCAL_MACHINE\SOFTWARE\Microsoft\Communicator\SessionManager\Apps
64-bit: HKEY_LOCAL_MACHINE\SOFTWARE\Wow6432Node\Microsoft\Communicator\SessionManager\Apps
Under Apps, you need to create a new key by right-clicking the Apps node and selecting New -> Key. The name of the key should be a GUID, in the following format:
{4E7AB9CC-AFE7-4EC5-BF72-27A98F526BA2}
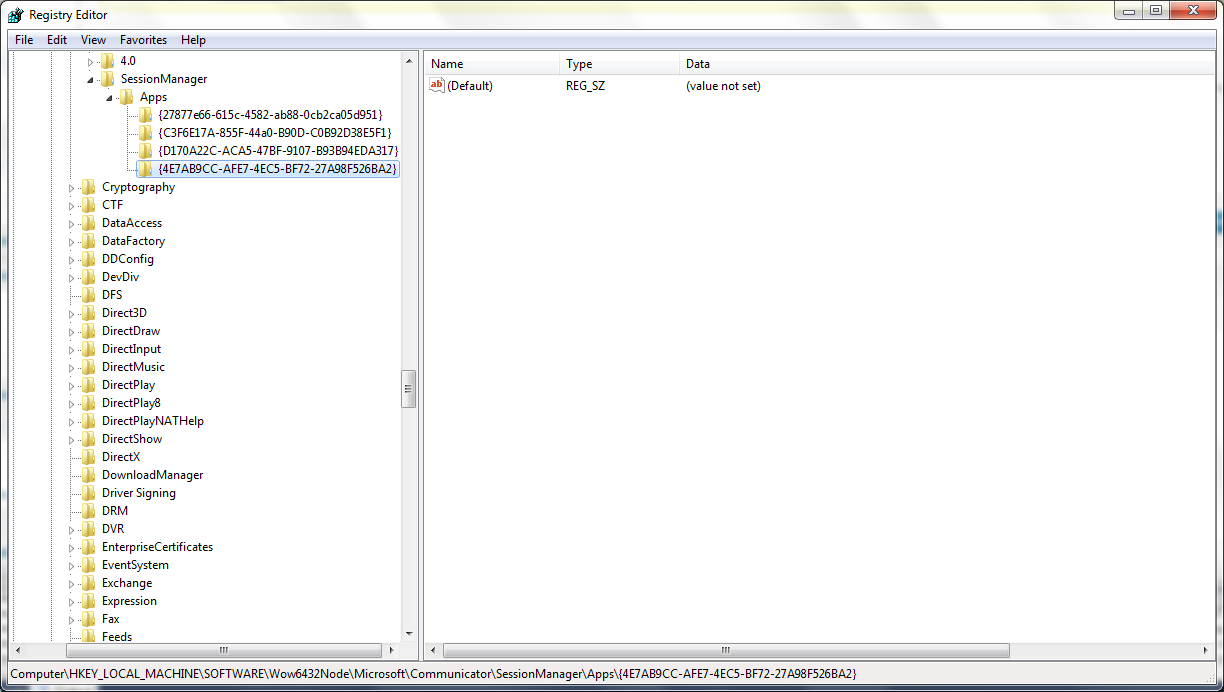
When you first create this new key, you’ll have the registry equivalent of a blank slate. It will look something like this:
You’ll need to fill this with a whole bunch of registry subkeys. The first is Name. Right-click on the space on the right, under the item called (Default), and select New -> String Value. Type in Name for the name of the subkey. Then double-click on it and enter the text you want to use for your menu item.
Next, create a DWORD subkey by right-clicking on the space on the right and selecting New -> DWORD (32-bit) Value. Name this one ApplicationType. You have two choices here: if you want your menu item to execute a locally installed program, use the value 0. If you want it to load a web location (which can be any protocol, not just http) then use 1.
If you use 0 as the value for ApplicationType, you need to add another string value here called ApplicationInstallPath. This should be the exact path to the executable you want your menu item to run, no parameters or other fancy stuff on the end. If you use 1 for ApplicationType, then you can skip this step.
Next, you have another choice to make. Create a second DWORD subkey, and name this one SessionType. You have three options: 0, for a local session, 1, for a two-party session, or 2, for a multi-party session.
I’ll use an example to illustrate. Let’s say you are an architecture firm where staff frequently need to do collaborative reviews of architectural diagrams. You have a special client application that makes this possible. Now, you want to enable users to launch this application directly from Lync. Ideally, when they do this, it should automatically launch the same application on the machine of the person they are talking to, so that they can start sharing information as efficiently as possible.
SessionType controls this behavior. If you select option 0 for SessionType, the application will launch on the local machine only. If you select 1, it will launch the application on the other computer in a two-party session. If 2, it will launch the application on the computers of all other users in a multi-party conversation. (Note that it will prompt the remote users before launching the application.)
Okay, so you’ve chosen your value for SessionType. The next important subkey is called Path. The value for Path should be the exact path of the executable (if you’re launching an application) or the URL to load (if you’re using a URL).
“But wait,” you might be saying. “Didn’t we already specify the path for the application in the ApplicationInstallPath subkey?” What’s different about the Path subkey is that you can add in parameters using the special keywords %user-id% and %contact-id%. This allows you to pass some details into your application. The first one, %user-id%, will get replaced by the SIP URI of the user who is logged in to the Lync client. The second, %contact-id%, will get replaced by a list of contacts that are selected in Lync, if the user has selected the menu item from the contact list or a conversation. It’s important to enclose these keywords in quotes if you use them as parameters for an application – otherwise you may run into errors when Lync tries to execute the application. Here’s an example:
C:\LyncMenuTester.exe “%user-id%” “%contact-id%”
Next, if you like, you can add another string value called ExtensibleMenu; this is a semicolon-delimited list of places where the menu item will appear in the Lync client. Here are all the options together:
MainWindowActions;MainWindowRightClick;ConversationWindowActions;ConversationWindowRightClick;ContactCardMenu
If you don’t use specify this subkey, the default will be:
MainWindowRightClick;ConversationWindowActions
If you want to get fancy, you can also specify LargeIcon, SmallIcon, and Tooltip string values. The first two are absolute paths to PNG files that will be shown next to the menu item in Lync. The Tooltip one is probably self-explanatory.
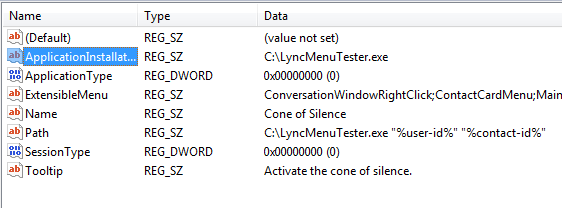
Once you’ve entered your settings, the registry key should look more or less like this:

To test my new custom menu item, I’ve created a small console app, possibly the smallest one I’ve ever written since Hello World. Here it is in it’s entirety:
using System;

namespace LyncMenuTester
{
    class Program
    {
        static void Main(string[] args)
        {
            if (args.Length > 0)
            {
                Console.WriteLine("User: {0}", args[0]);
            }
            if (args.Length > 1)
            {
                Console.WriteLine("Contact: {0}", args[1]);
            }

            Console.ReadLine();
        }
    }
}
As you can see, all it does it take the two parameters I’ve passed to the .exe and output them to the console. We’ll use this to confirm that the menu item is working properly.
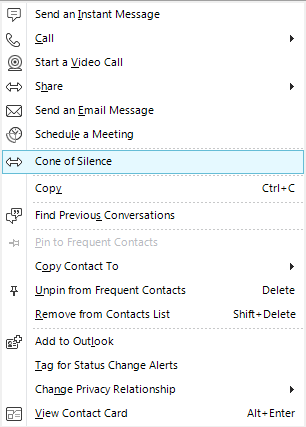
When I open Lync now, and right-click on a contact, my new menu item appears in the list:

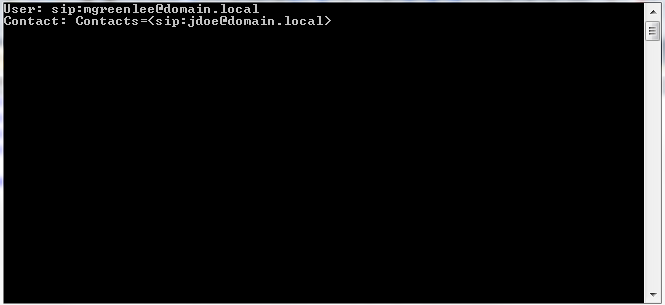
If I select it, my tester application launches, and displays my information:

Now, this is all pretty cool already, but let’s look at one scenario where you might need to go a bit further. Going back to our architecture firm example, let’s imagine that we want to launch a architectural collaboration client on the PC of each participant in the conversation. All of these clients should then join a single session so that the participants can see the same diagrams and work on them together. The trouble is: how do we ensure that all of the clients know to join the same session?
To solve this, we can add custom parameters to the application path name, just like the %user-id% and %contact-id% parameters we discussed earlier. There can be up to seven parameters like this, and they are called %param1% through %param7%. So, for example, I might change my Path value to be:
C:\LyncMenuTester.exe “%user-id%” “%contact-id%” “%param1%”
The values for these parameters are user-specific, and come from subkeys that you add to the HKEY_CURRENT_USER registry hive. You need to create a key at the path HKEY_CURRENT_USER\Software\Microsoft\Communicator\SessionManager\Apps\Parameters\ whose name is the GUID of your application – the same GUID you used for the previous registry setting. So, for our example here, the new registry key would be HKEY_CURRENT_USER\Software\Microsoft\Communicator\SessionManager\Apps\Parameters\{4E7AB9CC-AFE7-4EC5-BF72-27A98F526BA2}.
Within this key, you create string subkeys called param1, param2, etc. You only need to create the ones you are actually going to use as parameters. When a user chooses your custom menu item, the values from these parameters on that user’s local machine will be passed to ALL the users in the session, and will go to the application that is launched on each user’s machine. This way, they can all have a session ID or other context that they share in common.
There are quite a lot of directions you can take these custom menu items, but this should get you started. Feel free to comment here or email me if you have questions.

Excellent , thanks for the info
Hi Michael
Good post!
I have done this on more than one occasion. Ie added a button to open the outlook calendar of the selected contact.
Im facing one “problem” though. When i click the custom menu and my app starts it also opens a lync conversation window, and in the example above i dont want that to happen. Any ideas on how to handle that?
Regards
Jonatan
Hi Michael,
Really helpful article.
I am facing one problem .I have created an windows application and i am sending the two parameters “%user-id%” “%contact-id%” to that application.These values are then being displayed as the text of two labels. The solution given above seems to work fine when i select the form after right clicking on a user from Lync Main window .But when i am using the “ExtensibleMenu”=”ConversationWindowActions;MainWindowRightClick” and open the form from the conversation window(Action Menu) of a particular user then the form does not shows up and nothing happens.
Could you suggest something.
Regards,
Rajat
Hi Michael,
Unfortunately I have the same problem as Rajat. Do you know a solution for this? Or at least the reason why it doesn’t work?
Best regards,
Denis
Hi Denis and Rajat,
I’m not sure why this wouldn’t work, but I’ll take a look and see what I can figure out.
Michael
Could you please tell us more about GUID. Which GUID you use there? I suppose this GUID must be bound to Microsoft Lync client instance.
You can use any GUID – it’s not related to anything else. You can use a website like http://www.guidgenerator.com/ to generate one.
Hallo all,
I like to open specific URL from conversation window.
I have action where I set:
path = http://example.com/form?Open&user=%user-id%&contact=%contact-id%
When I use this action right clicking on the contact, everything is OK, but if I click on action from conversation window, nothing happens.
Where could be a problem?
Thank you,
Lubo.
Hi Lubo,
Nothing happens at all when you select the action from the conversation window? I can’t think of any reason why it would work in one case but not the other, if it’s all set up in one registry setting.
Michael
As per the path specified , “HKEY_LOCAL_MACHINE\SOFTWARE\Microsoft\Communicator\SessionManager\Apps”
i cannot find any session manager in the communicator
can anybody help me on this .
As per the path specified , “HKEY_LOCAL_MACHINESOFTWAREMicrosoftCommunicatorSessionManagerApps”
i cannot find any session manager in the communicator
can anybody help me on this .
Hi Michael,
i tried giving the ApplicationType as 1.
but in vain , the custom menu is not in LYNC ,
Hi Michael,
Do you have any information about the registry key settings in Lync 2013?
I have the same problem as Jonatan,Can you have resolvent
hi Olaf
the answer is:
HKEY_LOCAL_MACHINE\SOFTWARE\Microsoft\Office\15.0\Lync\SessionManager\Apps
http://msdn.microsoft.com/en-us/library/office/jj945535.aspx
Hi,
I am successful in creating the custom menu.
But my requirement is to launch a polycom video call of a contact. The SIP address of polycom is available in custom attribute of the contact.
Is this possible.
Hey Michael,
Can you guide me how to add icon for the custom command that is created using the above method?
Hi Michael,
were you able to find the solution for rajat and
denis problem (3rd and 4th comment)
please reply
thanks,
jammy
Jammy – no, I haven’t been able to figure out why this doesn’t work.
Harsha, I don’t know of any way to add an icon.