Posted: July 15th, 2009 | Author: Michael | Filed under: OCS Development, UCMA 2.0 | No Comments »

what happens if you let UCMA clean your house
The layer of abstraction that makes UCMA 2.0 such a powerful tool can also, once in a while, be dangerous. If we’re not careful enough, we can easily get the idea that the API will take care of everything for us: SIP messaging, media negotiation, presence subscriptions, house cleaning. UCMA does handle the connection to Office Communications Server without being asked (and it cooks a delicious filet mignon), but there are some things you need to remember to explicitly tell it to do.
My previous post on the UseRegistration property describes one of these. Another one that has tripped me up a couple of times is accepting transfers. If you’ve used the transfer methods in UCMA, you know how easy it is to send a transfer to a remote endpoint, with a single asynchronous method call and a handful of parameters. If the remote endpoint is Office Communicator, the new conversation window pops up and your transfer goes off without a hitch. What happens, though,if your UCMA application receives a transfer?
In other words,what happens if you call into your UCMA application from Communicator, hit the transfer button, and transfer the call to another number?
The answer is that, by default, nothing happens. The transfer fails, because UCMA 2.0 applications don’t accept transfers out of the box.
To allow your application to receive transfers for a call, you need to handle the TransferReceived event on that call:
_avCall.TransferReceived +=
new EventHandler(_avCall_TransferReceived);
The code to accept the transfer, in the grand tradition of UCMA 2.0, consists of one method called Accept, with a parameter (signaling headers) that can almost always be null.
void _avCall_TransferReceived(object sender,
AudioVideoCallTransferReceivedEventArgs e)
{
e.Accept(null);
}
Well, there you have it. With that minor alteration, your application now accepts transfers, at least on that one AudioVideoCall.
If you want to accept forwards (really only applicable for outgoing calls) you’re looking at something very similar:
_avCall.Forwarded +=
new EventHandler(_avCall_Forwarded);
The code to accept a forward is even simpler:
void _avCall_Forwarded(object sender, CallForwardReceivedEventArgs e)
{
e.Accept();
}
If that isn’t cool enough for you (I admit it’s a little anticlimactic), you can be more selective about the transfers you accept.
void _avCall_TransferReceived(object sender,
AudioVideoCallTransferReceivedEventArgs e)
{
if (e.TransferredBy == "sip:telemarketer@useless-widget.com")
{
e.Decline();
}
else
{
e.Accept(null);
}
}
Finally, depending on what you are doing with your application, you will probably want a handle to the new Conversation initiated by the transfer:
void _avCall_TransferReceived(object sender,
AudioVideoCallTransferReceivedEventArgs e)
{
e.Accept(null);
_conversation = e.NewConversation;
}
As you can see, this is all still very simple. Just remember to do it whenever your application needs to accept transfers, and you’re in business.
Posted: June 9th, 2009 | Author: Michael | Filed under: OCS Development | No Comments »
This long-awaited volume on Unified Communications development, which covers the Office Communicator Automation API and the Unified Communications Managed API (both Core and Workflow SDKs), has been released and is shipping. You can get your copy at Amazon.com, and check out some excerpts while you’re waiting for it to arrive. The book was written by Microsoft employees with intimate knowledge of the APIs and their insides, and promises to be an informative read.
Posted: May 12th, 2009 | Author: Michael | Filed under: OCS Development | No Comments »
I am at TechEd this week, where we are announcing our new presence-powered real-time expert finder, Clarity Connect.
I wanted to point out two books that are great resources if you are doing any kind of development with the Microsoft Unified Communications platform.
The first is the Office Communications Server 2007 R2 Resource Kit. This book focuses on the structure and configuration of Office Communications Server, and is a good read if you want to get a comprehensive idea of how OCS works, which can be very helpful for development.
The second is Programming for Unified Communications, which is due to be released very soon. This book actually delves into development with the UC APIs, and should be an indispensible resource once it comes out.
The OCS Resource Kit book is also on Twitter — you can get bits and pieces of OCS info at http://twitter.com/DrRez.
Posted: May 8th, 2009 | Author: Michael | Filed under: OCS Development, UCMA 2.0 | 4 Comments »
If you’ve ever tried to escalate an AudioVideoCall to a conference, you will know that it isn’t the smooth, carefree experience that the words “conference escalation” call to mind. It has its pitfalls. Take a look at the following code:
private void CreateCallAndEscalate()
{
     // Create a conversation and a call.
     _conversation = new Conversation(_endpoint);
     _call = new AudioVideoCall(_conversation);
     _call.BeginEstablish(_yourSipUri, null, CallEstablishCompleted, null);
}

private void CallEstablishCompleted(IAsyncResult result)
{
     _call.EndEstablish(result);
     _conversation.ConferenceSession.BeginJoin(JoinCompleted, null);
}

private void JoinCompleted(IAsyncResult result)
{
     _conversation.ConferenceSession.EndJoin(result);

     try
     {
          _conversation.BeginEscalateToConference(EscalateCompleted, null);
     }
     catch (InvalidOperationException ex)
     {
          Console.WriteLine("Escalate failed:");
          Console.WriteLine(ex.ToString());
     }
}

private void EscalateCompleted(IAsyncResult result)
{
     try
     {
          _conversation.EndEscalateToConference(result);
     }
     catch (RealTimeException ex)
     {
          Console.WriteLine("Escalate failed:");
          Console.WriteLine(ex.ToString());
     }
}
At first glance, you might expect this code to cheerfully bump your AudioVideoCall up into the ad hoc conference and frolic off into the sunset. But no such luck. Run it, and you will be furnished with the following exception message:
Microsoft.Rtc.Signaling.OperationFailureException: The EscalateToConferenceAsyncResult operation has failed with message: “Call cannot escalate to conference, mediaProvider does not support escalation”. See the InnerException and FailureReason properties as well as the logs for additional information. —> System.InvalidOperationException: Call cannot escalate to conference, mediaProvider does not support escalation at Microsoft.Rtc.Collaboration.Call.BeginEscalate(McuSession mcuSession,AsyncCallback userCallback,Object state)
To make a long story short, the media provider for AudioVideoCalls doesn’t have built-in support for escalation to a conference. Thankfully, there IS a way to get an existing two-party call into an ad hoc conference. The ConferenceSession object that belongs to the Conversation in turn has its own AudioVideoMcuSession. You can call the BeginTransfer method on the AudioVideoMcuSession to transfer an existing two-party call to the MCU, effectively bringing it into the conference. The new JoinCompleted method would look something like this:
private void JoinCompleted(IAsyncResult result)
{
     _conversation.ConferenceSession.EndJoin(result);
     try
     {
          _conversation.ConferenceSession.AudioVideoMcuSession.BeginTransfer(
               _call, null, McuTransferCompleted, null);
     }
     catch (InvalidOperationException ex)
     {
          Console.WriteLine("MCU transfer failed:");
          Console.WriteLine(ex.ToString());
     }
}
You also need a callback method:
private void McuTransferCompleted(IAsyncResult result)
{
     try
     {
          _conversation.ConferenceSession.AudioVideoMcuSession.EndTransfer(
              result);
     }
     catch (RealTimeException ex)
     {
          Console.WriteLine("MCU transfer failed:");
          Console.WriteLine(ex.ToString());
     }
}
When you run this code (you’ll need to do the extra work of setting up a CollaborationPlatform and endpoint and so forth) it will look very much like the application is placing a call and then escalating it to a conference. For a lot of situations (such as accepting incoming two-party calls and then bringing them into a conference) this will fit the bill perfectly well.
Feel free to email me if you have questions about this or if you’d like the code for the full sample application.
Posted: April 14th, 2009 | Author: Michael | Filed under: OCS Development, UCMA 2.0 | No Comments »
College students, like very small children, are easily entertained. Back in my college days, I always thought it would be fun to play with the campus PBX phone system by calling a classmate and then transferring the call to a random professor as soon as they answered the phone. The ensuing call would go something like this:
Student: Hello?
<>
Professor: Hello?
Student: Hello?
Professor: Yes, this is Professor Wolford; who is this?
Student: I think you may have the wrong number…
Professor: Did you call me?
Student: I don’t think so; maybe it was someone else?
Professor: Then why are you on the phone? I’m not sure I understand.
Student: This is my phone. You called 4512, right?
Professor: You called me. At least, my phone rang.
Student: I’m sorry, I thought my phone rang…
Professor: Excuse me, I have a good deal of work to do. Please don’t call me again. Thank you.
<>
Now, if only I’d had UCMA 2.0 back in my college years, I could have pulled this off with an Office Communication Server deployment and a few well-chosen lines of code. I wouldn’t even have had to mess with pulsating dial tones and FLASH buttons.
There are many more practical uses for code-driven transferring of calls, and I’m going to show you a few ways of doing this using UCMA 2.0. If you use this knowledge to set up stupid phone pranks instead of creating an auto-dialer for your call center or placing calls on behalf of employees through your CRM system,I take no responsibility for the results.
As our starting point,we’ll use the template I gave you a few posts ago for the PresenceMonitor class. To get things off the ground, go ahead and change the SubscribeToPresence method to ExecuteTransfer.
private void EstablishCompleted(IAsyncResult result)
{
    _endpoint.EndEstablish(result);
    Console.WriteLine("Established endpoint.");

    ExecuteTransfer();
}
We’re also going to need a handful of new instance variables, so I’ll just give them to you now to paste somewhere around the top of your class. Leave the constants with server settings alone, and make sure you have the following for your private instance variables:
private string _mySipUri;
private string _yourSipUri;
private string _yourSipUri2;
private CollaborationPlatform _platform;
private UserEndpoint _endpoint;
private Conversation _conversation;
private AudioVideoCall _call;
private Conversation _conversation2;
private AudioVideoCall _call2;
Also, change the first part of the run method, where it collects SIP URIs, to take three instead of two:
Console.Write("Enter your SIP URI: ");
_mySipUri = Console.ReadLine();

Console.Write("Enter another SIP URI: ");
_yourSipUri = Console.ReadLine();

Console.Write("Enter a third SIP URI: ");
_yourSipUri2 = Console.ReadLine();
To kick things off, paste the following into your class for the ExecuteTransfer method. All we’ll do for now is create a new Conversation object and a new AudioVideoCall object associated with that conversation.
private void ExecuteTransfer()
{
    // Create a conversation and a call.
    _conversation = new Conversation(_endpoint);
    _call = new AudioVideoCall(_conversation);
}
At the bottom of the method, add another line of code to actually place the call. This particular override of the BeginEstablish method allows us to specify a single SIP URI with which we want to establish a one-on-one call (or peer-to-peer call, as we say in the biz).
_call.BeginEstablish(_yourSipUri, null, CallEstablishCompleted, null);
As you can see, we’ll need a callback method named CallEstablishCompleted. If you move really quickly, you may be able to paste it in before Visual Studio starts getting antsy and marking things with squiggly red lines. Hurry up!
private void CallEstablishCompleted(IAsyncResult result)
{
    _call.EndEstablish(result);

    // Execute an unattended transfer
    _call.BeginTransfer(_yourSipUri2,
        new CallTransferOptions(CallTransferType.Unattended),
        TransferCompleted, null);
}
The first parameter of BeginTransfer is the SIP URI of the transfer target – the SIP URI to which we want to transfer the call. The second parameter is an instance of CallTransferOptions, which in turn takes a CallTransferType, in this case Unattended. The third and fourth parameters are the usual suspects, our callback delegate and state object.
We’re starting with the unattended transfer type because in a way it’s the most primitive. In an unattended transfer, Endpoint A says to Endpoint B, “Go talk to this other person,” and then hangs up without waiting to see that the transfer goes through. Endpoint A has no way of knowing whether the transfer was successful. Unattended transfer is for the risk-takers and daredevils among endpoints.
Last but not least, we need a callback method for the transfer operation. This one is straightforward.
private void TransferCompleted(IAsyncResult result)
{
    try
    {
        _call.EndTransfer(result);
    }
    catch (OperationFailureException ex)
    {
        Console.WriteLine("Couldn't complete the transfer.");
    }
    Console.WriteLine("Transfer initiated.");
}
Once you’ve plugged in this last callback method, go ahead and test out the code. (You’ll need to have a console application or something like that to start everything up; I’ll let you take care of that on your own.)
A couple of friendly reminders, since I always forget these myself: first, make sure to add sip: to the beginning of the SIP URIs you enter when testing, or things will break, and there won’t even be any exciting flying sparks. Second, if you have any weird issues, take a close look at the SIP URIs you entered. I can’t count the number of times I’ve spent a solid hour on fruitless debugging only to realize that, thanks to a misspelled configuration setting, my code was trying to contact someone at Clartiy Consulting instead of Clarity.
If all goes well, when you run the sample you will get an incoming call from your own SIP URI at the second SIP URI you entered. As soon as you answer the call, a new call window will pop up with an outgoing call to the third SIP URI, and the first call will hang up.
So far, so good.
Let’s try a subtle but important change. Go back to the CallEstablishCompleted method and change the CallTransferType to CallTransferType.Attended.
_call.BeginTransfer(_yourSipUri2,
    new CallTransferOptions(CallTransferType.Attended),
    TransferCompleted, null);
Now run your program again and watch carefully what happens.
This time, when that second call window pops up with the transfer, the initial call will stay put while the transfer goes through, looking something like this:

It won’t hang up until the person at the third SIP URI answers the transferred call. It’s sort of like when you give someone a ride home, and you wait until they’ve gotten in the front door and waved goodbye before you drive away, just in case they forgot their keys and no one’s home.
If you don’t answer the transferred call, the EndTransfer method will throw an OperationFailureException with a message that the transfer couldn’t be completed, which we’re catching in the TransferCompleted method. At this point, you’ll be able to resume the first call if you like.
If you’ve even been on hold with a customer service agent, and they’ve said to you, “I’m going to see if so-and-so is available, and if she is, then I’ll transfer you; if not, I’ll be back,” then you’ve seen this process at work. With an attended transfer, your code can keep tabs on whether the transfer worked, and resume the initial call if it didn’t.
Next, we’re going to look at what is probably the coolest of the transfer types: the supervised transfer. It only works with OCS 2007 R2, and the clients you are calling must be using Office Communicator 2007 R2 for the transfer to go through properly. The supervised transfer involves something called call replacing.
The one issue we have with the transfers we’ve done so far is that we have to place the first call and then wait until the person answers before transferring them. This puts a bit of a damper on the prank – or, er, the call center auto-dialer. It would be nice if we could place both calls at once, and just transfer one into the other when we’ve got them both on the line.
So that’s exactly what we’re going to do.
Go back to your ExecuteTransfer method and change it so that it creates two conversations (_conversation and _conversation2) and two calls (_call and _call2). I’m sure you can do this yourself, but there’s an extra wrinkle we need to take care of, so here’s the code:
private void ExecuteTransfer()
{
    // Create a conversation and a call.
    _conversation = new Conversation(_endpoint);
    _call = new AudioVideoCall(_conversation);
    _conversation2 = new Conversation(_endpoint);
    _call2 = new AudioVideoCall(_conversation2);

    // Establish a call to the first SIP URI.
    _call.BeginEstablish(_yourSipUri, null, CallEstablishCompleted, _call);
    _call2.BeginEstablish(_yourSipUri2, null,
        CallEstablishCompleted, _call2);
}
The important thing to note is that we’re passing the call we’re establishing into the BeginEstablish method as the state parameter. This will allow us to magically pull it out of the IAsyncResult in a moment. Stay tuned.
Here’s our brand new CallEstablishCompleted method. This one works a little differently, since it needs to deal with callbacks for two different calls. Notice how we’re getting the correct AudioVideoCall object from the AsyncState property on the IAsyncResult, so we can call EndEstablish on the right call.
private void CallEstablishCompleted(IAsyncResult result)
{
    AudioVideoCall call = result.AsyncState as AudioVideoCall;
    call.EndEstablish(result);

    if (_call.State == CallState.Established &&
        _call2.State == CallState.Established)
    {
        // Execute a supervised transfer
        _call.BeginTransfer(_call2, TransferCompleted, null);
    }
}
We also check to see if both calls are established; once we’ve got both of them up and running, we begin the transfer. We’re using a new and unfamiliar override of BeginTransfer here – this one takes three parameters, and the first one is another AudioVideoCall object. What’s going on here?
This supervised transfer works by adding a Replaces header to the SIP REFER message that tells the other endpoint to go talk to someone else. The Replaces header tells the endpoint to plug into a specific existing call, so that we can seamlessly bridge together two calls we’ve already established separately with different people.
Run the sample and see what happens. This time, you won’t see two different call windows when the transfer is in process. Instead, the call will magically turn into a call with a different person.
You now have several new tools at your disposal – unattended transfer, attended transfer, and supervised transfer – that may be used either for good or for evil. I trust you to make the right decisions.
The finished class, in all its glory, is here.
Check back soon for installment two, in which I delve into some even crazier territory with dialing out from conferences and a roundabout way to escalate AudioVideoCalls.
Posted: March 25th, 2009 | Author: Michael | Filed under: OCS Development, UCMA 2.0 | No Comments »
One of the most common issues you are likely to run into in doing UCMA 2.0 development is the following exception:
Microsoft.Rtc.Internal.Sip.TLSException: CertificateInfoNative::AcquireCredentialsHandle() failed; HRESULT=-2146893043
Most often, it means that the process does not have permission to access the certificate you are using to authenticate for transport layer security (TLS). There are a number of reasons why this might happen.
If you are debugging your application in Visual Studio, make sure you are running Visual Studio as an administrator. You can do this by right-clicking on Visual Studio in the start menu and choosing Run as administrator.
If it’s a console application or a Windows service you’re trying to run, make sure the account you are running it under has permission to access the private key of your certificate.
For websites running in IIS, you may need to use WinHttpCertCfg.exe to grant access to the private key.
Posted: March 21st, 2009 | Author: Michael | Filed under: OCS Development, UCMA 2.0 | No Comments »
The Internet can be a disturbing place. You may not expect that hundreds thousands of Internet delinquents are out to hijack your UCMA 2.0 application, but in the realm of Internet security, as with tipping your barber, the rule is always “better safe than sorry.”
Accordingly, when you are running a UCMA 2.0 application on a separate server, you need to create a certificate for it that is trusted by Office Communications Server. Since a number of people have asked, I am going to show you how to do this.
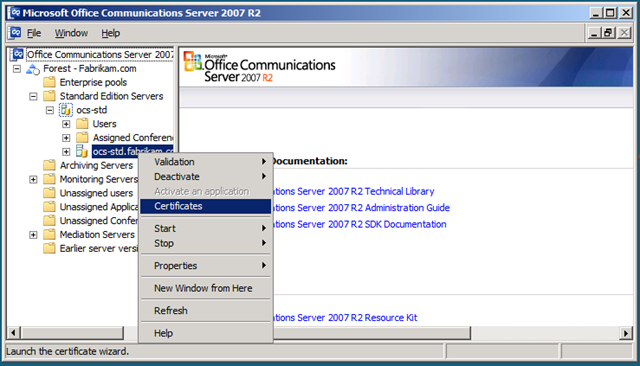
Our journey begins on the server that is functioning as your Standard Edition Server or a Front End Server. On that machine, go to the Office Communications Server 2007 R2 management console at Start –> All Programs –> Administrative Tools –> Microsoft Office Communications Server 2007 R2. You will see the lovely window depicted below. (Click on the screenshot to see a larger version.)
Expand those nodes in the left panel to get to your Standard Edition Server or Front End Server, and right-click on it. Choose the cleverly-named Certificates item.
You will get a new window for the Certificates Wizard. Click Next on the instructions page. Choose Create a new certificate and hit Next.
The next few screens walk you through the process of creating a certificate.
- Delayed or Immediate Request: You will want to choose Send the request immediately to an online certification authority.
- Name and Security Settings: For the name of the certificate you can use the fully qualified domain name (FQDN) of the server you want to run UCMA 2.0 applications on. Make sure that Mark cert as exportable is checked.
- Organization Information: The Organization field usually contains your organization’s legal name, and the Organizational unit field contains your department name.
- Your Server’s Subject Name: The subject name should be the exact FQDN of the server you’ll be using for your UCMA 2.0 applications.
- Geographical Information: You can handle this one.
- Choose a Certification Authority: Just what it says. You will need to have the root certificate for this certification authority installed on your UCMA 2.0 application server as well.

- Request Summary: Make sure everything looks right.
- Assign Certificate Task: Select Assign certificate later.
Once you’ve finished with the Certificate Wizard, you’ll need to export the certificate to move it to the other server. Right-click again on your server in the list, and choose Certificates. This time,choose Export a certificate to a .pfx file.
In the following screens,choose the certificate you just created, with the FQDN of your application server, and specify a password. Save the file in a remote and inaccessible location somewhere in the middle of the Kalahari Desert.
At this point, we will take a two minute break so you can transport your freshly minted .pfx file to your UCMA 2.0 application server. You can do this by creating a shared directory on one of the servers and sticking the .pfx in there, or by some other method of your choosing.
…
Okay, now that we’re back, it’s time to import the certificate on your application server. Open the Microsoft Management Console. You can do this by going to the Start menu and typing mmc.
In the Management Console, go to File –> Add/Remove Snap-in. Add the Certificates snap-in by choosing it in the list on the left and clicking Add. Choose Computer account and click Next and Finish. Click OK.
Expand the Certificates node.
It’s a downhill run from here, folks. Just right-click on Personal and select All Tasks –> Import. In the open dialog that comes up, you’ll need to select Personal Information Exchange (.pfx, .p12) in the file type drop-down next to the file name. Choose the .pfx file and click Open. Click Next, enter your password from earlier, Next, Next, Finish.
Congratulations! You’ve set up a certificate on your application server, you can sleep soundly at night, secure from those ten million UCMA 2.0 application server hijackers at large in cyberspace, and all is well in the world.
Please feel free to leave comments or contact me if you have any issues with this scary but rewarding process of creating certificates for UCMA 2.0 applications.
Posted: March 11th, 2009 | Author: Michael | Filed under: OCS Development, UCMA 2.0 | No Comments »
 Let’s say, for purposes of illustration, that you have a little problem.
Streamlining your Unified Communications development with the concise magic of UCMA 2.0 has suddenly made you rich and famous, and freed up most of your development time. Before, you spent hours hunched over an ancient 640×480 CRT monitor, debugging uncooperative server applications; now you write a few lines of code on your 30″ wall-mounted flat-panel monitor while toying with the allocation of your latest $10 million in investment funds on your other 30″ wall-mounted flat-panel monitor, and within minutes your application is ready for production.
The trouble: you don’t want your boss to think that all this wealth and fame has gone to your head. When she’s signed into Communicator and available, you want to make sure she sees that you’re slaving away, hard at work. When she’s away from the desk and can’t keep tabs on your Communicator presence, you can relax a little.
Thankfully, UCMA 2.0 allows you to manage presence subscriptions and receive notifications whenever there is a change in the presence of one of your subscription targets.
We worked through the code to get a platform and a UserEndpoint established in my last post, so this time I’ll skip ahead a bit and just give you a class with all of that code written. If you want to dig into the details of how the setup and teardown works,you can check out my previous post (on publishing presence).
This class is pretty generic,so you can use it for trying out other UCMA 2.0 features as well. The only caveat is that it hasn’t really got any error handling, so it’s obviously not suitable for production code or even for anything at all complicated.
public class PresenceMonitor
{
    private const string STATE_XML_FORMAT =
        "<state xmlns="http://schemas.microsoft.com/2006/09/sip/state"" +
        " xmlns:xsi="http://www.w3.org/2001/XMLSchema-instance" manual=" +
        ""true" xsi:type="userState">{0}" +
        "";

    private const string NOTE_XML_FORMAT =
        "" +
        "{0}";

    private const int AVAILABLE = 3500;
    private const int BUSY = 6500;

    private const string APP_USER_AGENT = ...
    private const string LOCALHOST = ...
    private const int PORT = ...
    private const string GRUU = ...
    private const string OCS_SERVER = ...
    private const int TLS_PORT = 5061;

    private string _mySipUri;
    private string _yourSipUri;

    private CollaborationPlatform _platform;
    private UserEndpoint _endpoint;

    public void Run()
    {
        Console.Write("Enter your SIP URI: ");
        _mySipUri = Console.ReadLine();

        Console.Write("Enter the SIP URI to monitor: ");
        _yourSipUri = Console.ReadLine();

        IAsyncResult startupAsyncResult = StartUp();

        Console.WriteLine("-----Press enter to shut down.-----");
        Console.ReadLine();

        startupAsyncResult.AsyncWaitHandle.WaitOne();

        Console.WriteLine("Shutting down...");
        IAsyncResult shutdownAsyncResult = Stop();

        Console.WriteLine("-----Press enter to exit.-----");
        Console.ReadLine();

        shutdownAsyncResult.AsyncWaitHandle.WaitOne();
    }

    #region Startup
    private IAsyncResult StartUp()
    {
        ServerPlatformSettings settings =
            new ServerPlatformSettings(
                APP_USER_AGENT,
                LOCALHOST,
                PORT,
                GRUU,
                GetLocalCertificate()
            );

        _platform = new CollaborationPlatform(settings);
        return _platform.BeginStartup(StartupCompleted, null);
    }

    private void StartupCompleted(IAsyncResult result)
    {
        _platform.EndStartup(result);

        Console.WriteLine("Started up platform.");
        UserEndpointSettings endpointSettings =
            new UserEndpointSettings(
                _mySipUri,
                OCS_SERVER,
                TLS_PORT
            );

        _endpoint = new UserEndpoint(_platform, endpointSettings);
        _endpoint.BeginEstablish(EstablishCompleted, null);
    }

    private void EstablishCompleted(IAsyncResult result)
    {
        _endpoint.EndEstablish(result);

        Console.WriteLine("Established endpoint.");

        SubscribeToPresence();
    }
    #endregion

    private void SubscribeToPresence()
    {
        // Code to do something vaguely useful goes here.
    }
    #region Shutdown

    private IAsyncResult Stop()
    {
        return _endpoint.BeginTerminate(TerminateCompleted, null);
    }

    private void TerminateCompleted(IAsyncResult result)
    {
        _endpoint.EndTerminate(result);

        Console.WriteLine("Terminated endpoint.");

        _platform.BeginShutdown(ShutdownCompleted, null);
    }

    private void ShutdownCompleted(IAsyncResult result)
    {
        _platform.EndShutdown(result);

        Console.WriteLine("Shut down platform.");
    }

    private static X509Certificate2 GetLocalCertificate()
    {
        X509Store store =
            new X509Store(StoreLocation.LocalMachine);

        store.Open(OpenFlags.ReadOnly);

        X509Certificate2Collection certificates =
            store.Certificates;

        foreach (X509Certificate2 certificate in certificates)
        {
            if (certificate.SubjectName.Name.Contains(
                Dns.GetHostEntry("localhost").HostName)
                && certificate.HasPrivateKey)
            {
                return certificate;
            }
        }

        return null;
    }
    #endregion

}
Our code is going to go in the SubscribeToPresence method. The first thing we need to do is choose the presence categories that we want to subscribe to. The only one we need for now is the state category, which is the one that contains availability information.
_endpoint.RemotePresence.PresenceSubscriptionCategories =
    new string[] { "state" };
The method to add subscription targets takes a collection of RemotePresentitySubscriptionTargets. We only have one target, but we still need to put it into a list.
RemotePresentitySubscriptionTarget target =
    new RemotePresentitySubscriptionTarget(_yourSipUri, null);

List targets =
    new List() { target };
And, last but not least, we need to call the BeginAddTargets method. We’ll create the AddTargetsCompleted callback method in a second.
_endpoint.RemotePresence.BeginAddTargets(
    targets, AddTargetsCompleted, null
);
The callback method is mind-numbingly simple. We just call the end method to finish the asynchronous operation, and then write a line to the console saying that we added the presence target. I’ll take a minute to note here that if you were adding proper error-handling, you’d want to put that end method call in a try-catch block, because any exception that occurs during the asynchronous execution of the operation will get thrown in your code when you call the end method.
private void AddTargetsCompleted(IAsyncResult result)
{
    _endpoint.RemotePresence.EndAddTargets(result);
    Console.WriteLine("Added presence target.");
}
Things are looking balmy so far. If you ran the application now, it would successfully subscribe to the presence of the user whose SIP URI you enter. The trouble is that it wouldn’t do anything helpful with the presence information. We need to add an event handler for the PresenceNotificationReceived event.
This can go in the SubscribeToPresence method, right before you instantiate the RemotePresentitySubscriptionTarget.
_endpoint.RemotePresence.PresenceNotificationReceived +=
    new EventHandler(
        RemotePresence_PresenceNotificationReceived
    );
In the event handler itself, things get a little dodgy. This is usually the case when XML parsing gets involved in the business. Bear with me.
void RemotePresence_PresenceNotificationReceived(object sender, RemotePresenceNotificationEventArgs e)
{
    foreach (RemotePresentityNotificationData
        notification in e.Notifications)
    {
        foreach (PresenceCategoryWithMetaData
            category in notification.Categories)
        {
            string xml = category.CreateInnerDataXml();

            if (xml != null && xml.Length > 0)
            {
                XmlDocument stateCategory = new XmlDocument();
                StringReader reader = new StringReader(xml);
                stateCategory.Load(reader);
                XmlNodeList availabilityNodeList =
                    stateCategory.GetElementsByTagName("availability");

                if (availabilityNodeList != null && availabilityNodeList.Count > 0)
                {
                    long availability =
                        Convert.ToInt64(availabilityNodeList[0].InnerText);

                    Console.WriteLine(
                        string.Format("Monitored user's presence changed to {0}",
                        availability)
                    );

                    ProcessAvailability(availability);
                }
            }
        }
    }
}
Here’s the story: in the event arguments for the PresenceNotificationReceived event, we get a collection of RemotePresentityNotificationData objects. Each of these has one set of presence categories for one Communicator user. Because we only subscribed to the state category, we’re assuming that all of the PresenceCategoryWithMetaData objects we get in the presence notifications represent state information. By calling CreateInnerDataXml on the PresenceCategoryWithMetaData object, we get the raw presence XML, which we can then rummage through to find the availability element. Once we’ve got our hands on that, it’s a simple matter of grabbing the number inside and doing something with it.
Here’s what we do with it:
private void ProcessAvailability(long busyness)
{
    if (busyness >= BUSY)
    {
        PublishAvailabilityAndNote(AVAILABLE, "Lounging on the beach");
    }
    else
    {
        PublishAvailabilityAndNote(BUSY, "Working incredibly hard");
    }
}
The availability values increase as availability decreases, so if the boss has an availability value of busy or greater, she’s probably not keeping tabs on us.
I covered the gritty details of publishing presence in my previous post, so again I’ll just give you the code here. The only important difference is that we’re publishing TWO categories here instead of just the one that we published before. The note category controls that bit of text that you can type in under your name in Communicator. The template for it is stored in a constant that I snuck into the code for the class that I gave you at the beginning of this post. Take a closer look if you’re curious about the format.
private void PublishAvailabilityAndNote(long availability, string note)
{
    string stateXml = String.Format(
        STATE_XML_FORMAT,
        availability
    );

    string noteXml = string.Format(
        NOTE_XML_FORMAT,
        note
    );

    CustomPresenceCategory customCategory =
        new CustomPresenceCategory("state", stateXml);

    CustomPresenceCategory noteCategory =
        new CustomPresenceCategory("note", noteXml);

    PresenceCategory[] categoriesToPublish =
        new PresenceCategory[] { customCategory, noteCategory };

    string presenceDescription = string.Format(
        "availability: {0}, note: {1}", availability, note
    );

    _endpoint.LocalOwnerPresence.BeginPublishPresence(
        categoriesToPublish,
        PublishPresenceCompleted,
        presenceDescription
    );
}

private void PublishPresenceCompleted(IAsyncResult result)
{
    _endpoint.LocalOwnerPresence.EndPublishPresence(result);

    Console.WriteLine(string.Format(
        "Changed my presence to ({0}).", result.AsyncState.ToString())
    );
}
With this final crowning touch, we’re all set. If you create a PresenceMonitor object and call its Run method in a console app, you can enter your SIP URI and the SIP URI to monitor (don’t forget to prefix both with sip:) and the application will do its work. Change the presence of the monitored user, and straight away your own presence will automatically respond, as you, meanwhile, watch YouTube videos while being fanned with palm fronds.
I’ll leave the question of where to prop up those 30″ flat-panel monitors on the beach to a future post.
Posted: March 4th, 2009 | Author: Michael | Filed under: OCS Development, UCMA 2.0 | No Comments »
One of the many useful features of the second version of the Unified Communications Managed API is its capability to publish presence through managed code. Using the methods of the LocalOwnerPresence instance attached to each endpoint, you can publish presence information in the form of XML in the five built-in presence categories provided by Office Communications Server: note, contactCard, calendarData, services, and state. You can also, if you choose, control which access control containers the presence information is published into. (The containers determine who gets to see the presence information; these are the groups that you assign people to by right-clicking them in Communicator and going to the Change Level of Access submenu.) If you like to live on the edge, you can even create your own custom presence categories, which you could use to publish information like your geographical location, subjects you can take customer calls about, the names of your pets,etc. You need to execute some stored procedures on the database used by OCS in order to actually put the categories into the running.
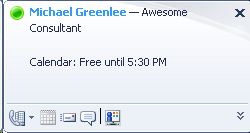
So,a few days ago I decided that “Available” didn’t quite do justice to my attitude; it seemed a bit mild and uninspired, especially with the dreary, foggy weather in Chicago. I wanted my Communicator availability to show more enthusiasm about how extremely available I am to come up with new uses for UCMA 2.0. With just a handful of lines of code, I published a bit of XML to my state presence category, causing me to show up in Communicator like this:

In order to publish the presence information, I had to start up a CollaborationPlatform, then establish a UserEndpoint (the type of endpoint you use in UCMA 2.0 if you want your code to act on behalf of a particular user), then publish the presence, and then terminate the endpoint and shut down the platform.
The block of XML that I used, stored in a constant, looks like this. The {0} represents a numeric availability code; the {1} represents the custom activity string that I want to publish.
private const string STATE_XML_FORMAT =
"<state xmlns="http://schemas.microsoft.com/2006/09/sip/state" " +
"xmlns:xsi="http://www.w3.org/2001/XMLSchema-instance" manual=" +
""true" xsi:type="userState">{0}" +
"{1}";
I also stuck the value for the “Available” level of availability (the green circle in Communicator) in a constant.
private const int AVAILABLE = 3500;
I’ll make a quick digression at this point to explain what’s going on with these availability codes.
There are four types of “state” that OCS aggregates together to determine what presence will show up next to your name in Communicator. Those four are user state (what you set yourself manually), machine state (how recently you did something on the computer, phone, device, or whatever), phone state (whether you are in a phone call or conference call), and calendar state (what’s on your calendar for the current time).
Ranges of availability codes correspond to different colors for the presence dot; for example, the 3xxx range gets you a green dot. 12xxx gets you a half-green, half-yellow dot. The availability codes have slightly different meanings for the different types of state. In machine state, 3500 means you are actively using the device. In calendar state, 3500 means that you are free according to your calendar at the current time.
You’ll notice in the XML above that the type of state we are publishing is user state. I’ve chosen to publish my state as “available,” using an availability code of 3500. I could have used any of the following:
- 3500 (Available)
- 6500 (Busy)
- 9500 (Do Not Disturb)
- 12500 (Be Right Back)
- 15500 (Away)
- 18500 (Offline)
The first step in publishing the presence information is starting up the CollaborationPlatform. To do this, I have to instantiate a ServerPlatformSettings object and pass it into the CollaborationPlatform constructor. Then I call BeginStartup on the new CollaborationPlatform.
public void Run()
{
Console.Write("Enter your SIP URI: ");
_sipUri = Console.ReadLine();
Console.Write("Enter the activity string you want to publish: ");
_activityString = Console.ReadLine();
ServerPlatformSettings settings = new ServerPlatformSettings(
APP_USER_AGENT,
LOCALHOST,
PORT,
GRUU,
GetLocalCertificate()
);
_platform = new CollaborationPlatform(settings);
_platform.BeginStartup(StartupCompleted, null);
}
Like most UCMA operations, starting up the CollaborationPlatform is asynchronous, so I’ve provided a callback delegate as the first parameter of the BeginStartup method. (The second parameter is an optional state object, which will be available in the AsyncState property of the IAsyncResult that I will get as a parameter of the callback delegate. I don’t use this here, since everything I need is stored in instance variables.)
You can force UCMA methods like this to execute synchronously (i.e., block the thread until they finish) by chaining together the begin and end methods, like so:
_platform.EndStartup(_platform.BeginStartup(StartupCompleted, null));
This is usually not a good idea, though, unless you are just testing something and want to keep it very simple. The best practice is to supply a callback delegate that will execute on a new thread whenever the UCMA operation completes. This is especially important if you want your application to be at all scalable.
The next step, in the callback method for BeginStartup, is to establish a UserEndpoint. First, though, we have to call EndStartup on the CollaborationPlatform. It’s important always to call the corresponding end method for any UCMA begin method you call. Usually you would want to wrap it in a try-catch block, because if an exception occurred during the asynchronous execution of the method, it will get thrown in your thread when you call the end method.
private void StartupCompleted(IAsyncResult result)
{
_platform.EndStartup(result);
Console.WriteLine("Started up platform.");
UserEndpointSettings endpointSettings = new UserEndpointSettings(
_sipUri,
OCS_SERVER,
TLS_PORT
);
_endpoint = new UserEndpoint(_platform, endpointSettings);
_endpoint.BeginEstablish(EstablishCompleted, null);
}
This is similar to the process for creating the CollaborationPlatform; we need a UserEndpointSettings object which we then pass into the UserEndpoint constructor. Once the endpoint is instantiated, we need to call BeginEstablish on it.
Once the endpoint finishes establishing, we’re ready to publish the presence.
The BeginPublishPresence method takes an array of PresenceCategory objects. PresenceCategory is an abstract class, with two derivatives: CustomPresenceCategory and PresenceCategoryWIthMetaData. The latter is what we would need to use if we wanted to specify things like which presence containers the presence information should go into. We would also have to use it if we were publishing presence for an ApplicationEndpoint.
In this case, we can use a CustomPresenceCategory to wrap the presence information. The constructor takes the category name (in this case, “state”) and the XML document.
private void EstablishCompleted(IAsyncResult result)
{
_endpoint.EndEstablish(result);
Console.WriteLine("Established endpoint.");
string stateXml = String.Format(
STATE_XML_FORMAT,
AVAILABLE,
_activityString
);
CustomPresenceCategory customCategory =
new CustomPresenceCategory("state", stateXml);
PresenceCategory[] categoriesToPublish =
new PresenceCategory[] { customCategory };
_endpoint.LocalOwnerPresence.BeginPublishPresence(
categoriesToPublish,
PublishPresenceCompleted,
null
);
}
Once the publish operation completes, we can clean up after ourselves by terminating the endpoint and shutting down the platform. The code to do this is really simple.
private void PublishPresenceCompleted(IAsyncResult result)
{
_endpoint.LocalOwnerPresence.EndPublishPresence(result);
Console.WriteLine("Published presence.");
_endpoint.BeginTerminate(TerminateCompleted, null);
}
private void TerminateCompleted(IAsyncResult result)
{
_endpoint.EndTerminate(result);
Console.WriteLine("Terminated endpoint.");
_platform.BeginShutdown(ShutdownCompleted, null);
}
private void ShutdownCompleted(IAsyncResult result)
{
_platform.EndShutdown(result);
Console.WriteLine("Shut down platform.");
}
If you run this code (make sure you are running it as an administrator, or you’ll get a TLS exception) it should publish the activity message you choose so that it shows up in Communicator beside your name.
Here is the complete code for my CustomActivityPublisher class.
using System;
using System.Collections.Generic;
using System.Linq;
using System.Text;
using Microsoft.Rtc.Collaboration;
using Microsoft.Rtc.Collaboration.Presence;
using System.Security.Cryptography.X509Certificates;
using System.Net;
namespace PresenceSample
{
public class CustomActivityPublisher
{
private const string STATE_XML_FORMAT =
"<state xmlns="http://schemas.microsoft.com/2006/09/sip/state"" +
" xmlns:xsi="http://www.w3.org/2001/XMLSchema-instance" manual=" +
""true" xsi:type="userState">{0}" +
"{1}";
private const int AVAILABLE = 3500;
private const string APP_USER_AGENT = ...
private const string LOCALHOST = ...
private const int PORT = ...
private const string GRUU = ...
private const string OCS_SERVER = ...
private const int TLS_PORT = 5061;
private string _sipUri;
private string _activityString;
private CollaborationPlatform _platform;
private UserEndpoint _endpoint;
public void Run()
{
Console.Write("Enter your SIP URI: ");
_sipUri = Console.ReadLine();
Console.Write("Enter the new activity string: ");
_activityString = Console.ReadLine();
ServerPlatformSettings settings =
new ServerPlatformSettings(
APP_USER_AGENT,
LOCALHOST,
PORT,
GRUU,
GetLocalCertificate()
);
_platform = new CollaborationPlatform(settings);
_platform.BeginStartup(StartupCompleted, null);
}
private void StartupCompleted(IAsyncResult result)
{
_platform.EndStartup(result);
Console.WriteLine("Started up platform.");
UserEndpointSettings endpointSettings =
new UserEndpointSettings(
_sipUri,
OCS_SERVER,
TLS_PORT
);
_endpoint = new UserEndpoint(_platform, endpointSettings);
_endpoint.BeginEstablish(EstablishCompleted, null);
}
private void EstablishCompleted(IAsyncResult result)
{
_endpoint.EndEstablish(result);
Console.WriteLine("Established endpoint.");
string stateXml = String.Format(
STATE_XML_FORMAT,
AVAILABLE,
_activityString
);
CustomPresenceCategory customCategory =
new CustomPresenceCategory("state", stateXml);
PresenceCategory[] categoriesToPublish =
new PresenceCategory[] { customCategory };
_endpoint.LocalOwnerPresence.BeginPublishPresence(
categoriesToPublish,
PublishPresenceCompleted,
null
);
}
private void PublishPresenceCompleted(IAsyncResult result)
{
_endpoint.LocalOwnerPresence.EndPublishPresence(result);
Console.WriteLine("Published presence.");
_endpoint.BeginTerminate(TerminateCompleted, null);
}
private void TerminateCompleted(IAsyncResult result)
{
_endpoint.EndTerminate(result);
Console.WriteLine("Terminated endpoint.");
_platform.BeginShutdown(ShutdownCompleted, null);
}
private void ShutdownCompleted(IAsyncResult result)
{
_platform.EndShutdown(result);
Console.WriteLine("Shut down platform.");
}
private static X509Certificate2 GetLocalCertificate()
{
X509Store store =
new X509Store(StoreLocation.LocalMachine);
store.Open(OpenFlags.ReadOnly);
X509Certificate2Collection certificates =
store.Certificates;
foreach (X509Certificate2 certificate in certificates)
{
if (certificate.SubjectName.Name.ToLower().Contains(
Dns.GetHostEntry("localhost").HostName.ToLower())
&& certificate.HasPrivateKey)
{
return certificate;
}
}
return null;
}
}
}
Posted: February 23rd, 2009 | Author: Michael | Filed under: OCS Development, UCMA 2.0 | No Comments »
If you are just starting out in developing an application using UCMA, you may be confused about where to get the settings to feed the constructors for ServerPlatformSettings, ApplicationEndpointSettings, and UserEndpointSettings.
If divining the port and GRUU from the entrails of an animal is not an option, you will need to start by “provisioning” your application by creating a trusted service object for it in Active Directory. If it uses an ApplicationEndpoint (usually because it is a “bot” rather than a proxy for a particular user), you will also need to provision it with one or more contacts.
The easiest way to do this provisioning is with the ApplicationProvisioner.exe tool that is packaged with the UCMA v2.0 SDK. (You will still need to have enough permissions to create trusted service objects and contact objects in Active Directory in order to use ApplicationProvisioner.exe.) You can find the tool in the UCMA SDK 2.0 directory under UCMACoreSample ApplicationsCollaborationApplicationProvisioner. You may need to compile the solution in Visual Studio to get the executable.
There is a fairly thorough step-by-step description of how to provision a new application using ApplicationProvisioner.exe on MSDN at http://msdn.microsoft.com/en-us/library/dd253360(office.13).aspx.
Once you provision your application, there are basically two ways to snap your newly minted GRUU and other settings into your UCMA code. One is simply to double-click the listing under “Servers” in ApplicationProvisioner.exe and copy the GRUU from the View Server box. At this juncture, you can drop the unpronounceable sequence of numbers and letters into a config file, live dangerously by adding it directly into your code, or even sell it on eBay for $10k and donate the proceeds to the Salvation Army.
A cleaner, if slightly more complex, alternative is to reference ApplicationProvisioning.dll from your project and use the ApplicationProvisioning API to load the settings dynamically using your application’s name. The advantage is that even if you need to change the trusted service later,you won’t need to make any configuration changes to your application. The new settings will be loaded next time you start up the application.
You can find an article on this method at http://msdn.microsoft.com/en-us/library/dd253328(office.13).aspx.